
Part 1: The Linux Philosophy - CLI vs GUI (The Ultimate Deep Dive)
Linux ko samajhna sirf commands ratna nahi hai, balki ek naye Computing Mindset ko apnana hai. Jab aap Windows use karte ho, toh aap ek "Guest" hote ho jise wahi dikhaya jata hai jo Microsoft chahta hai. Lekin Linux mein aap "God Mode" mein hote ho. Is section mein hum Linux ke core architecture, uski philosophy, aur kernel mechanics ko itni gehraai mein samjhenge ki aapko screen par chalne wale har ek character ka technical logic pata hoga.
1.1 The Genesis: Why Linux is the Hacker's Backbone
1991 mein Linus Torvalds ne jab Linux banaya, toh unka maqsad ek free aur open-source kernel dena tha. Ek hacker ke liye iska matlab hai Total Transparency. Windows ka source code secret hai, lekin Linux ka ek-ek line ka code aap padh sakte ho, modify kar sakte ho aur apna khud ka OS bana sakte ho (Jaise Offensive Security ne Debian ko modify karke **Kali Linux** banaya).
1.2 CLI vs GUI: The War of Resources & Control
Cybersecurity experts mouse ka use kyun nahi karte? Iske piche sirf "Cool" dikhna nahi, balki technical efficiency hai.
🖥️ Graphical User Interface (GUI)
- **Abstraction Layer:** GUI aapko asliyat se door rakhta hai. Jab aap file delete karte ho, toh
piche kya process hui, ye aapse chhupaya jata hai.
- **Bloatware:** GUI ko chalane ke liye hazaron background processes chahiye jo RAM aur CPU consume
karti hain. Ek server par GUI chalana resources ki barbaadi hai.
- **Non-Scriptable:** Aap GUI buttons ko automate nahi kar sakte.
⌨️ Command Line Interface (CLI)
- **Granular Control:** Aap system ke un hardware parts ko bhi control kar sakte ho jinke liye GUI
mein koi button hi nahi hai.
- **Zero Overhead:** CLI sirf kuch KB RAM leta hai. Ye purane se purane computer ko supercomputer
bana deta hai.
- **The Power of Pipes:** Ek command ka output dusri command mein bhej kar aap complex tasks ko ek
line mein nipata sakte ho.
1.3 Linux Architecture: The Fortress Layers
Linux system 4 main layers mein banta hota hai. Is structure ko samajhna hacker ke liye system ki "anatomy" samajhne jaisa hai:
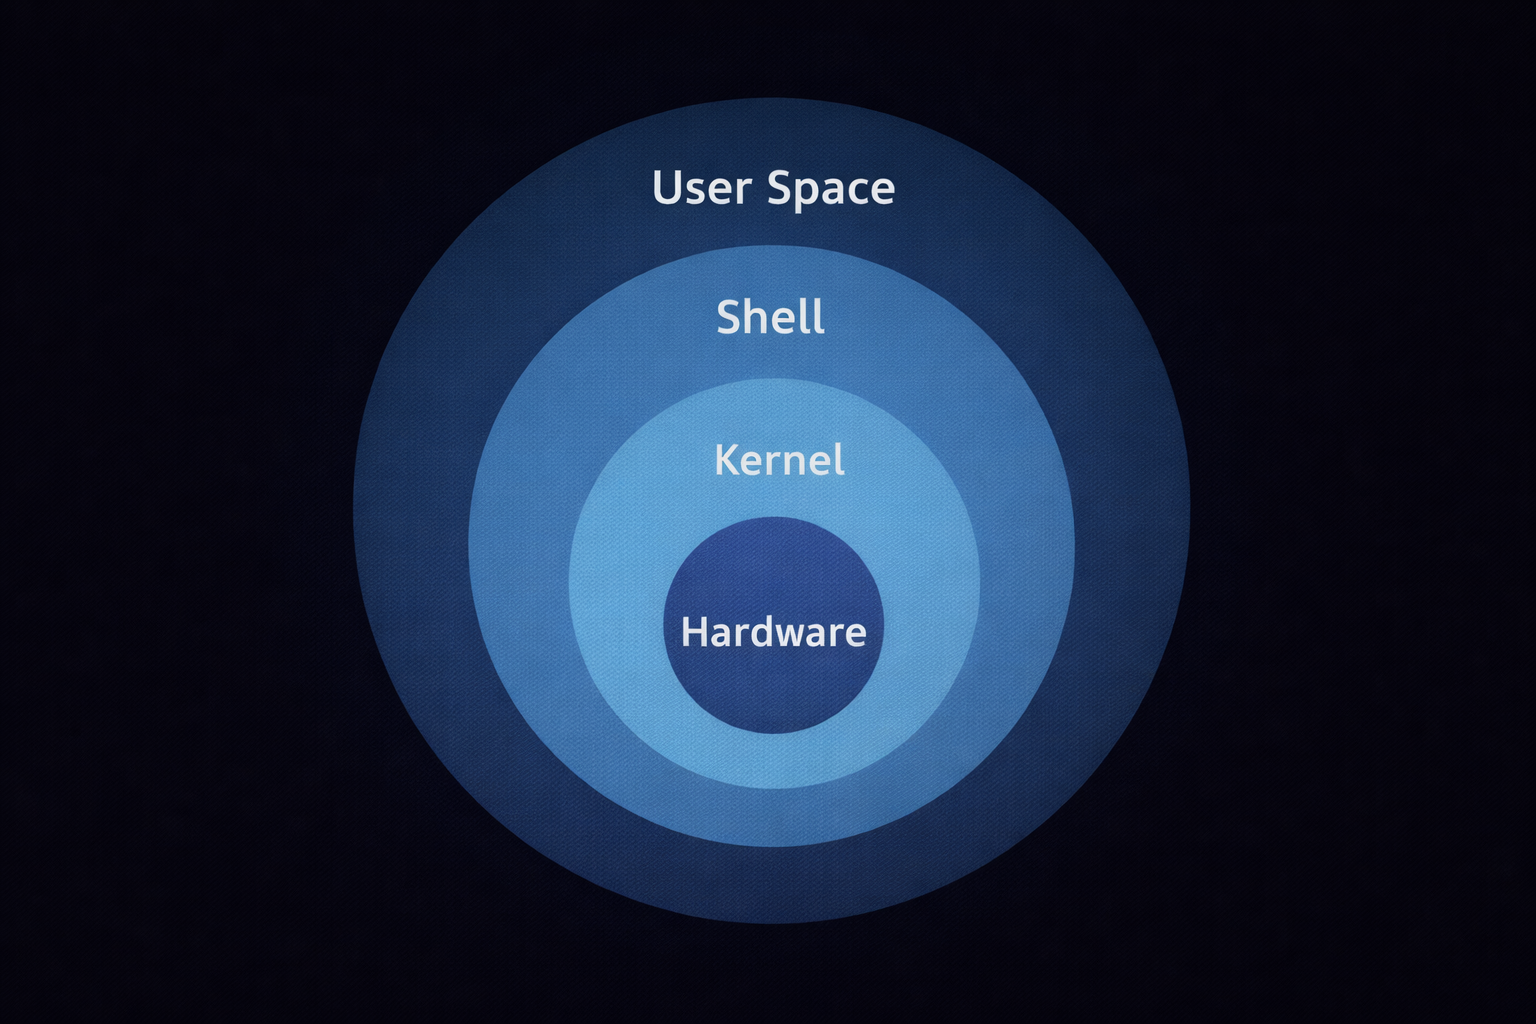
- 1. Hardware Layer: Sabse niche aapka physical computer hota hai (CPU, RAM, Hard Drive).
- 2. The Kernel (The Brain): Ye OS ka dil hai. Iska kaam hai hardware aur software ke beech 'System Calls' ke zariye baat karwana. Kernel hi decide karta hai ki kaunsa program kitni memory lega.
- 3. The Shell (The Translator): Jab aap
lstype karte ho, toh Shell usse decode karta hai aur Kernel ko batata hai. Popular shells: **Bash** (Legacy) aur **Zsh** (Modern/Kali default). - 4. User Space: Yahan hamare terminal, browsers, aur hacking tools (Nmap, Metasploit) run hote hain.
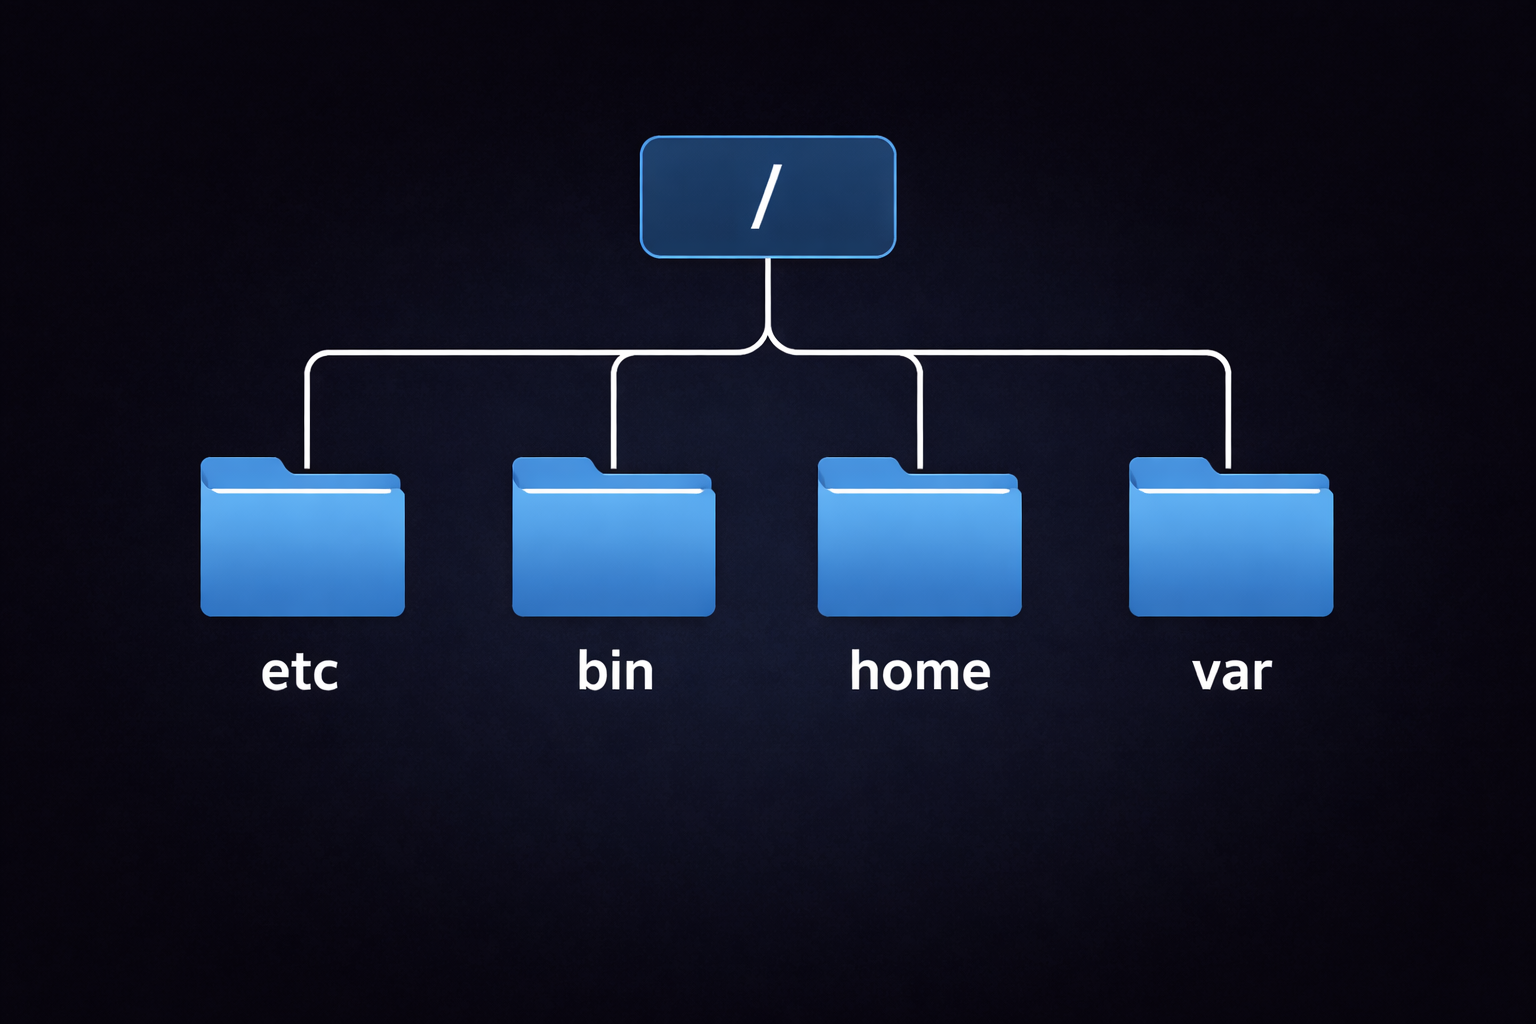
1.4 Filesystem Hierarchy Standard (FHS)
Linux mein koi C: drive nahi hoti. Sab kuch ek tree structure mein hota hai jo Root
(/) se shuru hota hai.
Part 1 Summary: The Foundation
- Open Source: Linux ka code transparent hai, jo hacking ke liye best hai.
- CLI Superiority: CLI speed, automation aur resources ke maamle mein GUI se behtar hai.
- Everything is a File: Hardware ho ya network, Linux sabko file ki tarah treat karta hai.
- Kernel: Hardware aur user apps ke beech ka bridge hai.
- Hierarchy: Linux mein
/(Root) hi sab kuch hai, koi alag drives nahi hoti.
1.5 Core Interaction Commands
| Command | Function | Hacker Use-Case |
|---|---|---|
uname -a |
System aur Kernel details dikhata hai. | Kernel exploit dhoondhne ke liye version check karna. |
echo $SHELL |
Bataiye aap kaunsa shell (Bash/Zsh) use kar rahe ho. | Script compatibility check karna. |
whoami |
Current logged-in user batata hai. | Check karna ki kya humne 'Root' access pa liya hai. |
history |
Purani saari commands ki list dikhata hai. | Pichle admin ne kya commands chalayi thi wo dekhna. |
clear |
Terminal screen saaf karta hai. | Clutter saaf karke focus badhana. |
🛡️ Part 1 - Reality Check
Apne terminal par ye perform karo:
uname -rchala kar dekho tumhare Linux ka kernel version kya hai.ls /etc/passwdkarke dekho kya tum system ke users ki list dekh paa rahe ho?- Ek command likho
echo "Cyberseekh Mastery"aur dekho shell kaise translate karta hai.
Part 2: Navigation Mastery - The Science of Path Traversal
Linux mein folders ko Directories kaha jata hai, lekin ye sirf folders nahi hain; ye system ke 'Global Map' ke nodes hain. Jab aap Windows mein ek folder par double-click karte ho, toh aapko lagta hai ki aap "andar" ja rahe ho, lekin Linux terminal mein, aap system ke Tree Structure mein coordinates ke zariye travel karte ho. Is section mein hum Navigation ki aisi gehraai mein jayenge jahan se rasta bhatakna namumkin ho jayega.
2.1 Path Physics: Absolute vs Relative Coordinates
Linux mein kisi bhi file tak pahunchne ke do raaste hote hain. Inhe samajhna hi terminal mastery ki pehli sidhi hai.
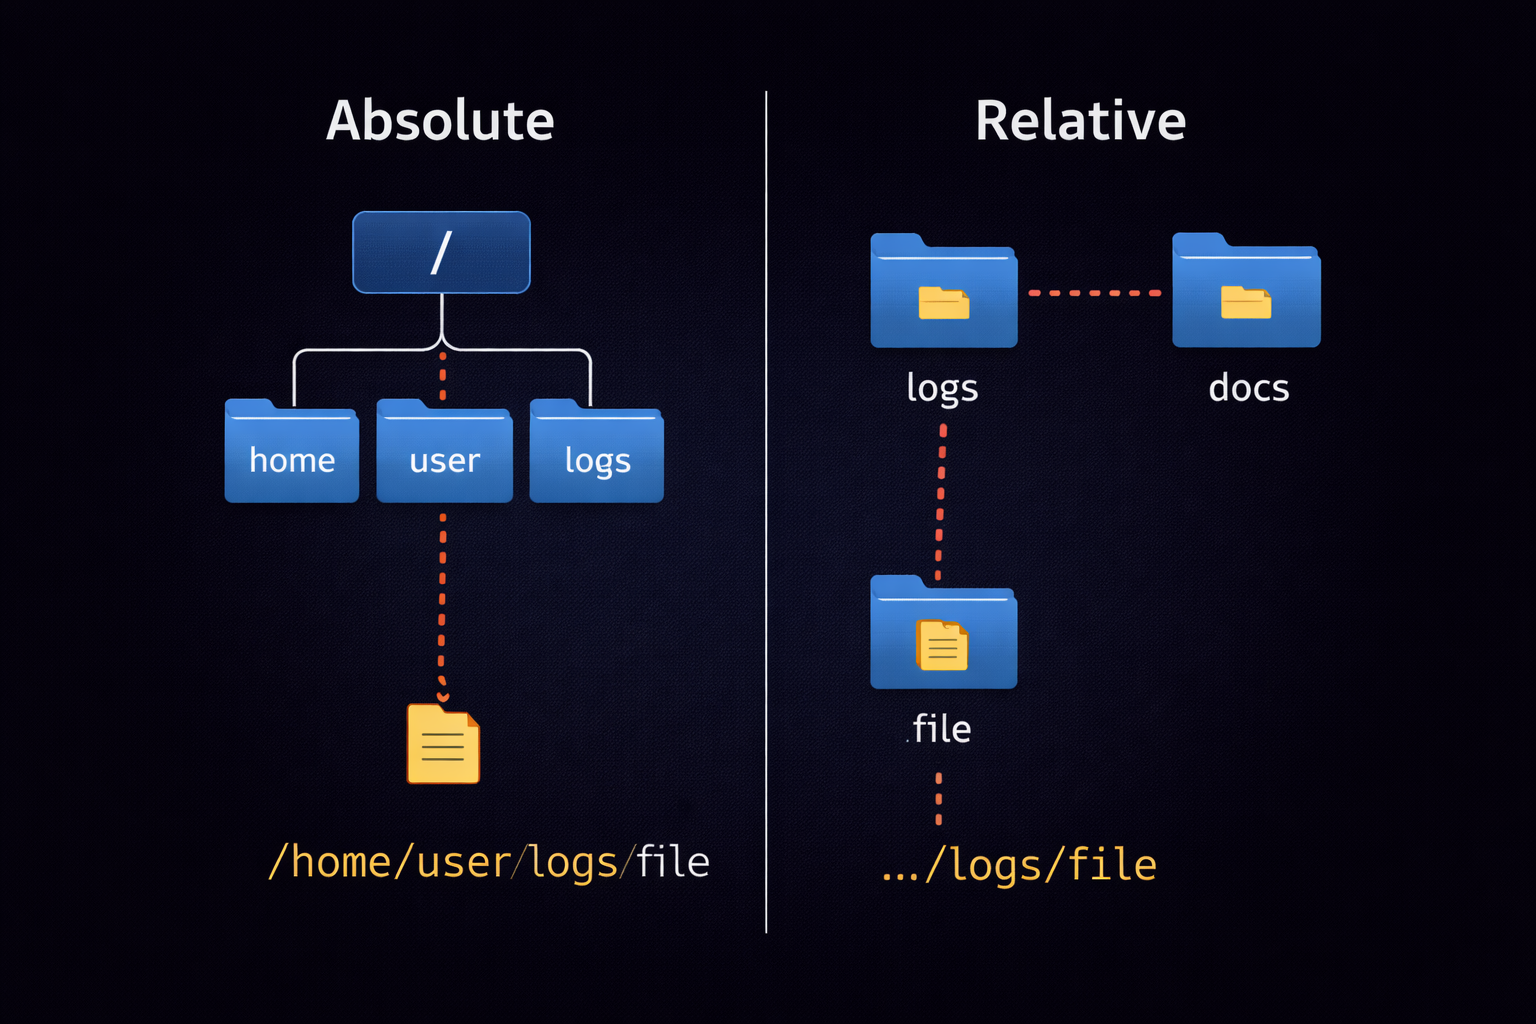
🗺️ Absolute Path (The Universal Address)
Absolute path hamesha Root (/) se shuru hota hai. Ye system ka "Full Address" hai
jo kabhi nahi badalta, chahe aap kisi bhi directory mein khade hon.
Example: /home/kali/Desktop/tools/nmap_scan.txt
📍 Relative Path (The Local Shortcut)
Relative path wahan se shuru hota hai jahan aap abhi (Current Working Directory)
khade ho. Ye aapki current location ke reference mein kaam karta hai.
Example: Agar aap /home/kali mein ho, toh sirf cd Desktop
likhna kafi hai.
2.2 PWD & The Hidden Reality of Directories
Jab aap terminal open karte ho, toh aap hamesha ek directory ke "context" mein hote ho. pwd
(Print Working Directory) aapko batata hai ki aapka 'Current Context' kya hai.
Hacker Insight: Hacking scripts likhte waqt hamesha pwd ka use karke paths ko
verify karna chahiye taaki galti se system files delete na ho jayein.
2.3 LS Deep Dive: The X-Ray Vision
ls (List) command sirf files ke naam dekhne ke liye nahi hai. Ye file system ka X-Ray hai jo
"Flags" ke zariye system ki secrets batata hai.
2.4 CD: The Art of Teleportation
cd (Change Directory) command terminal par move karne ka rasta hai. Isme kuch shortcuts hackers
ki speed 10x badha dete hain.
cd ..: Ek step piche (Parent directory) jana.cd ~: Seedha apne Home directory mein wapas ana.cd -: Pichle jis folder mein the, wahin wapas jana (Undo jump).
2.5 Advanced Navigation: Inodes & Wildcards
Linux files ko unke naam se nahi, balki unke Inode number se pehchanta hai. Saath hi, hazaron files ko filter karne ke liye hum Wildcards ka use karte hain.
Part 2 Summary: Navigation Mastery
- Paths: Absolute path root
/se shuru hota hai, Relative current location se. - Verification:
pwdka use location confirm karne ke liye karein. - Visibility:
ls -ase hidden hacking tools dhoondhe ja sakte hain. - Speed:
cd -aurcd ~shortcuts navigation ko fast banate hain. - Logic: Linux system Inode numbers par chalta hai, na ki sirf file names par.
2.6 Quick Reference: Navigation Commands
| Command | Function | Hacker Example |
|---|---|---|
pwd |
Current directory path dikhana. | Location verify karna script chalane se pehle. |
ls -lah |
Hidden files aur details (Human Readable) dikhana. | Malware aur config files ki deep inspection. |
cd .. |
Parent directory mein jana. | Folder hierarchy mein piche move karna. |
cd - |
Pichle folder mein wapas jana. | Do directories ke beech fast jump karna. |
ls -i |
File ka Inode number dikhana. | File linking aur duplicates check karna. |
🛡️ Part 2 - Navigation Reality Check
Sirf padhne se kuch nahi hoga, terminal kholo aur ye 5 tasks karke dikhao:
-
Task 1: The Hidden Hunt
Apne Home directory mein jao aurls -achalao. Kya tumhe.bashrcya.zshrcdikh rahi hai? Ye tumhari shell ki sabse important config file hai. -
Task 2: Absolute vs Relative Challenge
Pehlecd /etc/network(Absolute) karke wahan jao. Phir wahan secd ../ssh(Relative) karke SSH folder mein jao. Check karopwdse tum sahi jagah ho ya nahi. -
Task 3: The Inode Audit
Kisi bhi file ka Inode number check karo:ls -i filename. Linux isi number se file ko track karta hai, naam se nahi! -
Task 4: Wildcard Magic
/binfolder mein jao aur dekho kitni commands 'z' se shuru hoti hain:ls /bin/z*. -
Task 5: The Teleport Back
Ek lambe path par jao (jaise/var/log/apache2), phircd ~karke home aao, aur phircd -dabao. Dekho kaise tum ek second mein wapas usi lambe path par pahunch gaye.
Agar tumne ye saare tasks kar liye, toh samajh lo tum Linux Navigation ke Driver ban chuke ho! 🚀
Part 3: File Surgery - Creation, Manipulation & Data Destruction
Linux mein files sirf data store karne ka zariya nahi hain, balki ye system ke atoms hain. Ek hacker ke liye file manipulation "Surgical" honi chahiye. Aapko pata hona chahiye ki file kaise banti hai, uska metadata (stat) kya kehta hai, aur sabse zaroori—usse aise kaise delete karein ki forensics team bhi usse recover na kar sake. Is section mein hum files ke sath 'Operation' karna seekhenge.
3.1 The Art of Creation: Beyond the 'touch' Command
Zyadatar log sirf touch jante hain, lekin ek pro-hacker ke paas file banane ke kai advanced
tarike hote hain, har ek ka apna logic hota hai.
3.2 Manipulation: Moving, Copying & Renaming Mechanics
Jab aap cp ya mv use karte ho, toh piche Linux ke **Inodes** aur **Data Blocks**
move hote hain. Isse samajhna zaroori hai taaki aap bade data sets ko efficiently handle kar sakein.
📋 cp (Copying Power)
Files ki duplicate banana.
• cp -p: Permissions aur Timestamps ko preserve karta hai (Forensics ke liye
zaroori).
• cp -r: Poore folder ko copy karta hai.
🚚 mv (Moving & Renaming)
Linux mein 'Rename' ke liye alag command nahi hai. mv hi renaming ka kaam karta hai.
• Agar destination same folder hai -> Rename.
• Agar destination alag folder hai -> Move.
3.3 Data Destruction: Shredding & The 'rm' Myth
Kya aapko pata hai rm file ko permanent delete nahi karta? Wo sirf Inode table se uska link
hatata hai, data abhi bhi disk par hota hai jise recover kiya ja sakta hai. Ek hacker ko "Anti-Forensics"
aani chahiye.
Agar aap chahte ho ki data recover na ho, toh
shred command use karein. Ye file ke upar
baar-baar random 0s aur 1s likhta hai.
shred -u -n 10 secret.txt
(-u = delete after shredding, -n 10 = 10 baar overwrite karna).
3.4 Advanced Tools: dd, ln, & split
Ye wo tools hain jo ek normal user ko dara dete hain, lekin ek professional hacker ke liye ye "Gold" hain.
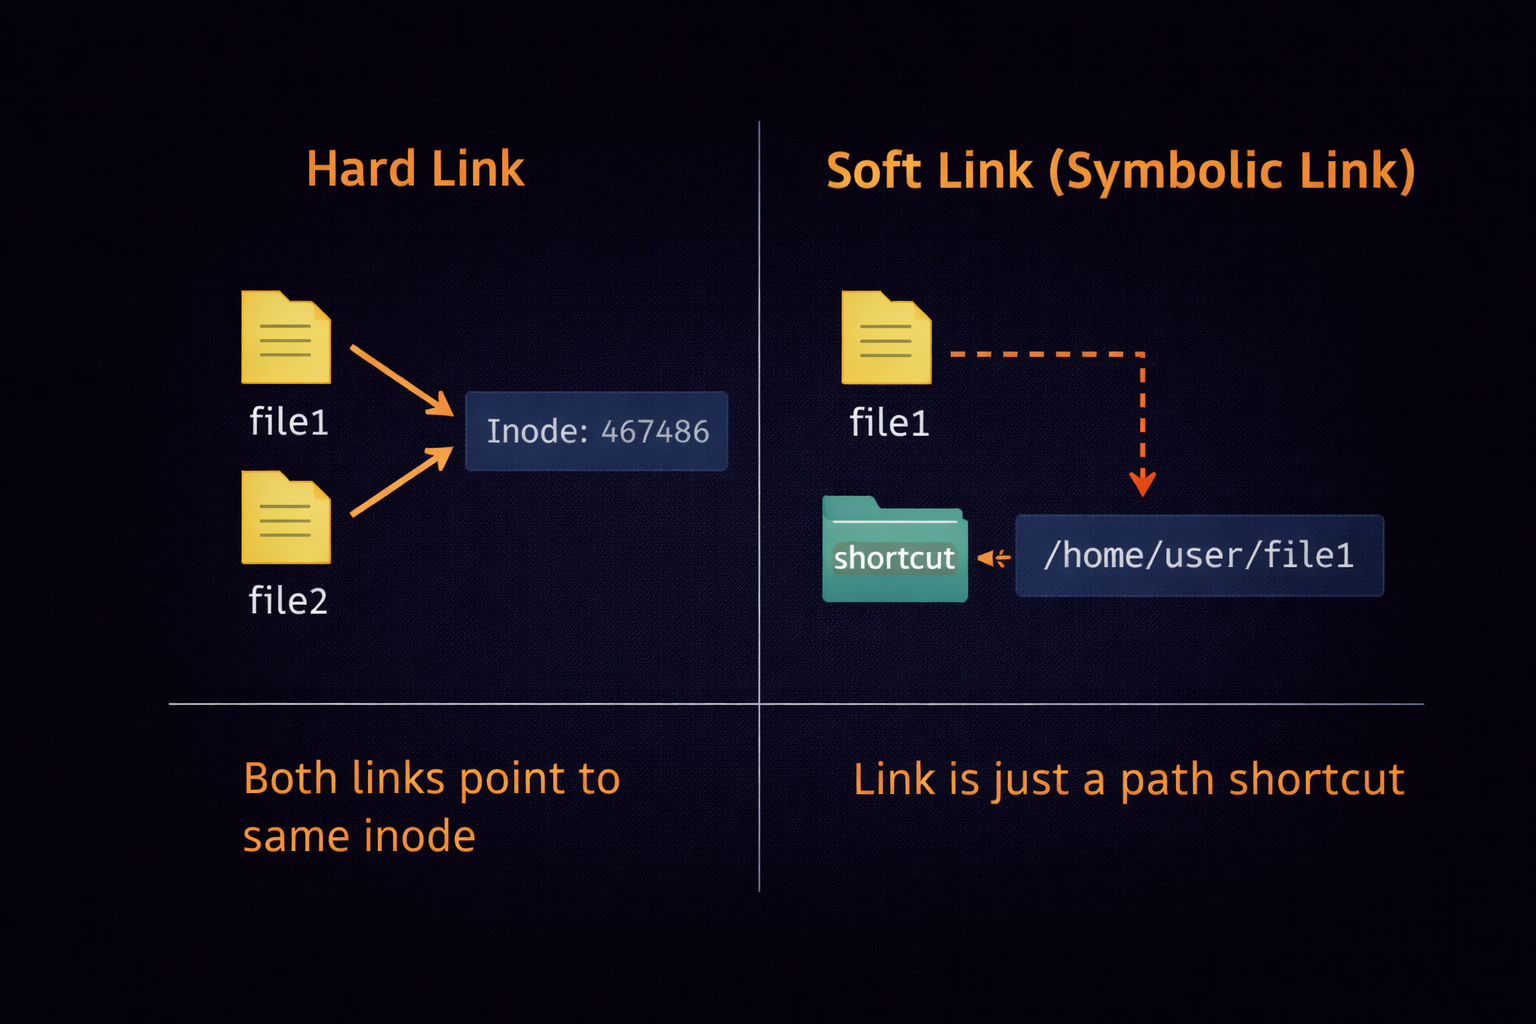
dd(The Disk Destroyer): Ye block-level par data copy karta hai. Ise poori Hard Drive ka clone banane ya "Bootable USB" banane ke liye use kiya jata hai.ln(Linking):
- **Soft Link (Symbolic):** Shortcut ki tarah (ln -s).
- **Hard Link:** Ek hi file ke do alag naam (Inode same rehta hai).split: Ek bahut badi file (jaise 10GB log file) ko chote-chote hisson mein todne ke liye.stat: File ki poori kundali nikalna (Birth time, Modification time, Access time).
3.5 Summary & Conclusion: File Mastery
File Surgery ka maksad hai system ke data par absolute control pana. Humne dekha ki file banane ke kai raste
hain, par forensics se bachne ke liye deletion sahi tarike se karna chahiye. Advanced tools jaise
dd aur stat aapko system ke deeper layers tak le jate hain.
Part 3 Summary
- Creation:
touchsirf khali file ke liye hai,echoaurcatse data inject kiya jata hai. - Manipulation:
mvrename aur move dono karta hai,cp -pmeta-data bachane ke liye use hota hai. - Destruction:
rmse data recover ho sakta hai,shredhi permanent solution hai. - Metadata:
statcommand se file ki history aur access details milti hain. - Block Copy:
ddka use disk imaging aur hardware level data transfer ke liye hota hai.
3.6 Quick Reference: File Surgery Commands
| Command | Function | Hacker Example |
|---|---|---|
touch |
Khali file banana / Timestamp update. | touch .hidden_log |
cp -r |
Recursive Copy (Folder copy). | cp -r /etc/backup /tmp/ |
mv |
Move aur Rename karna. | mv tool.exe /bin/newtool |
shred |
File ko recover na hone layak delete karna. | shred -u evidence.log |
ln -s |
Symbolic Link (Shortcut) banana. | ln -s /etc/shadow link |
dd |
Data Duplicator (Disk Clone). | dd if=/dev/zero of=/dev/sda |
split |
Badi file ko tukdon mein bantna. | split -b 100M dump.sql |
🔧 File Surgery Challenge
- Ek 1MB ki file banao
fallocateka use karke. - Us file ka full metadata dekho
statcommand se aur note karo 'Access time'. - Us file ka ek Hard Link banao aur check karo kya dono ka Inode number same hai?
- Aakhir mein
shredcommand se usse delete karo.
Part 4: The Ultimate Guide to Linux Permissions, Sudo & System Hierarchy
Linux ek "Identity-Based" multi-user environment hai. Yahan security ka sabse bada pahiya Permissions hai. Ek professional hacker ya system admin ke liye permissions sirf 'rwx' nahi hain; ye system ki "Cellular Structure" hain. Bina permission ke aap ek byte data bhi touch nahi kar sakte. Is section mein hum seekhenge ki kaise Linux "Permissions DNA" ko handle karta hai aur kaise aap administrative supremacy (Root) hasil kar sakte hain.
4.1 The DNA of Permissions: rwx Breakdown (Deep Dive)
Jab aap terminal par ls -l command chalate hain, toh aapko pehle 10 characters ka ek string
dikhta hai, jaise: -rwxr-xr--. Is string ka har ek character ek
scientific meaning hold karta hai.
👤 User/Owner (u)
Jisne file banayi hai. By default, owner ke paas pure control hota hai. Linux mein file ownership system ki stability ke liye zaroori hai.
👥 Group (g)
Ek department ya team. Maano 'HR' group ki saari files sirf HR members hi dekh sakte hain. Ye collaboration ke liye use hota hai.
🌍 Others (o)
Poori duniya (World). Jo log na toh owner hain aur na hi us group ka hissa hain, wo 'Others' category mein aate hain.
The Three Powers: r, w, x
- r (Read):
- File par: Content padhne ki power.
- Directory par:lskarke files ki list dekhne ki power. - w (Write):
- File par: Content change/delete karne ki power.
- Directory par: Nayi files banane ya purani delete karne ki power. - x (Execute):
- File par: Script ya binary program ko run karne ki power.
- Directory par:cdkarke uske andar ghusne ki power (Traverse).
4.2 Octal Logic: The Binary Power (Numeric Method)
Linux permissions ko numbers ke zariye bhi manage kiya jata hai. Isse "Octal Representation" kehte hain. Har permission ka ek binary value hota hai jo total hokar ek digit banta hai.
| Permission | Binary Symbol | Value |
|---|---|---|
| Read (r) | 4 (100 in binary) | 4 |
| Write (w) | 2 (010 in binary) | 2 |
| Execute (x) | 1 (001 in binary) | 1 |
| No Permission | - | 0 |
• rwx (4+2+1) = 7 (Full Access)
• rw- (4+2+0) = 6 (Read & Write)
• r-x (4+0+1) = 5 (Read & Execute)
• r-- (4+0+0) = 4 (Read Only)
Pro Case Study: 755 vs 644
Agar aapne chmod 755 script.sh kiya: Owner sab kar sakta hai (7), Group aur World sirf padh aur
run kar sakte hain (5).
Agar aapne chmod 644 config.txt kiya: Owner padh-likh sakta hai (6), baaki sirf padh sakte
hain (4).
4.3 Special Bits: SUID, SGID & Sticky Bit (Hacker's Playground)
Normal 'rwx' ke upar teen special permissions hoti hain jo system security mein "Magic" ya "Disaster" la sakti hain. Professional hackers hamesha inke liye system ko audit karte hain.
👑 SUID (Set User ID) - Octal 4000
Jab kisi file par SUID set hota hai, toh wo File Owner ki privileges ke saath run
hoti hai, chahe use 'Guest' user hi kyun na chala raha ho.
Code: chmod u+s /path/to/file
Risk: Agar kisi root file par SUID hai, toh normal user root ban sakta hai!
🛡️ SGID (Set Group ID) - Octal 2000
Ye SUID jaisa hi hai, par ye Group ki power use karta hai. Directory par set hone par ye ensure karta hai ki nayi files same group inherit karein.
📌 Sticky Bit - Octal 1000
Ye zyadatar shared folders (jaise /tmp) par hota hai. Iska matlab hai ki koi bhi file
bana sakta hai, par delete sirf wahi kar sakta hai jisne banayi ho.
Code: chmod +t /shared_folder
4.4 SUDO, Root & The Shadow World
Linux mein Root (UID 0) bhagwan hai. Wo kisi bhi file ko padh sakta hai, delete kar sakta
hai, aur kernel ko modify kar sakta hai. sudo (SuperUser DO) ek "Proxy Power" hai jo aapse
password mangti hai aur temporary root access deti hai.
4.5 Umask: The Default Guard
Kya aapne kabhi socha hai ki jab aap touch se file banate ho, toh use by-default
644 permission hi kyun milti hai? Ye umask (User Mask) ki wajah se hota hai.
Umask permission ko "Subtract" karta hai. Agar default file permission 666 hai aur umask 022 hai, toh nayi file 644 hogi (666 - 022 = 644).
Part 4 Summary: Access Control Mastery
- Identity Triad: Permissions hamesha User, Group aur Others (u, g, o) mein divide hoti hain.
- Octal Math: Read(4), Write(2), aur Execute(1) ke binary combinations se permission digits (0-7) bante hain.
- Ownership Physics:
chownuser badalne ke liye aurchgrpgroup badalne ke liye use hota hai. - Sudo Supremacy:
sudoadministrative tasks ke liye "God Mode" (Root) access temporary basis par udhaar deta hai. - Hacker Focus: SUID bits aur insecure 777 permissions privilege escalation ke liye sabse bade attack vectors hain.
- Umask: Ye decide karta hai ki nayi banne wali files ki default permissions kya hongi.
4.6 Professional Reference: Permission Commands Table
| Command | Deep Function | Real-World Example |
|---|---|---|
chmod 700 |
Sab kuch lock karna, sirf owner ke liye. | chmod 700 ~/.ssh (Secure keys)
|
chmod +x |
Binary ya script ko 'Run' mode mein lana. | chmod +x exploit.py |
chown -R |
Folder aur uske andar ka sab kuch owner badalna. | sudo chown -R kali:kali /var/www
|
sudo -u |
Kisi doosre user ke naam se command chalana. | sudo -u apache touch log.txt
|
getfacl |
Advanced Access Control List (ACL) dekhna. | Multi-user permissions audit karna. |
lsattr |
Immutable (jo delete na ho sake) files check karna. | Anti-rootkit auditing. |
👑 Part 4 - The Master Reality Check
Agar tumne ye 5 practical challenges solve kar liye, toh tum Linux Permissions ke "Shehanshah" ho:
- Challenge 1: The Locksmith
Ek directory banaoPrivate, usme ek file rakhosecret.txt. Permissions aisi set karo ki tum (owner) padh-likh sako, par koi doosra (Others/Group) us folder meincdbhi na kar sake. - Challenge 2: SUID Hunter
Poore system mein wo files dhoondho jinpar SUID set hai aur owner root hai:find / -perm -4000 -user root 2>/dev/null. List check karo, kya koi suspicious file dikhi? - Challenge 3: The Umask Wizard
Apna umask000karo aur ek file banao. Phir077karo aur doosri file banao. Dono ki permissionsls -lse compare karo. - Challenge 4: Identity Crisis
whoamichalao. Phirsudo -ichalao aur dobarawhoamichalao. Prompt ka rang aur symbol ($vs#) notice karo. - Challenge 5: The Immutable File
Ek file banao, root sechattr +i filenamechalao. Ab userm -rfse delete karne ki koshish karo. Dekho kya hota hai! (Hint: Ise hataane ke liye-iflag hatana hoga).
Practice makes a Hacker perfect. Keyboard uthao aur aag laga do! 🚀
Part 5: Data Surveillance & Networking (The Hacker's Eye)
Jab aap kisi system ko hack karte hain ya admin bante hain, toh asli chunauti data ki quantity hoti hai. Hazaron log files aur lakho lines ke beech se "Password" ya "API Key" dhoondhna ek kala hai. Ise Data Surveillance kehte hain. Saath hi, terminal se networking ko control karna hacker ki pehli priority hoti hai. Is section mein hum seekhenge ki kaise Linux terminal ko ek power-tool ki tarah use karke data aur network par kabza kiya jata hai.
5.1 Grep Mastery: Searching Through the Haystack
grep (Global Regular Expression Print) Linux ka sabse khatarnak search engine hai. Ye sirf text
nahi dhoondhta, ye "Patterns" ko pakadta hai.
5.2 Stream Manipulation: Sed & Awk (The Data Surgeons)
Jab data itna bada ho ki use manually edit na kiya ja sake, tab hum sed (Stream Editor) aur
awk (Text Processor) ka use karte hain.
✂️ sed (Find & Replace)
Bina file khole uske andar ke text ko replace karna.
Code: sed -i 's/old-ip/new-ip/g' settings.conf
Yahan 's' ka matlab substitute aur 'g' ka matlab global hai.
📊 awk (Column Expert)
Specific columns ko extract karne ke liye.
Code: awk -F':' '{ print $1 }' /etc/passwd
Ye command system ke saare usernames ki list nikal degi.
5.3 Pipes (|) & Redirection: Chaining the Chaos
Linux terminal ki asli taqat **Pipes** mein hai. Iska matlab hai ek command ka output dusre ka input banna. Ise "Command Chaining" kehte hain.
netstat -tuln | grep "LISTEN"
Iska matlab: "Pehle saare network ports dikhao, fir unme se sirf wo filter karo jo abhi open (LISTEN) hain."
Redirection Logic (>, >>, 2>)
- Overwrite (>): Purana data uda kar naya likhna.
ls > files.txt - Append (>>): Purane data ke niche naya add karna.
echo "New Login" >> access.log - Error Redirection (2>): Command ke errors ko file mein save karna.
bad_command 2> errors.log
5.4 Networking Mastery: Terminal Connectivity
Terminal se network ko troubleshoot karna aur targets ko scan karna hacker ka basic skill hai.
🌐 ip addr
Aapki machine ka IP address aur network status. Isse interface (eth0/wlan0) ki jankari milti hai.
📡 ping & traceroute
ping connectivity check karta hai. traceroute batata hai ki aapka data
kitne routers se hokar target tak pahuncha.
🌍 curl & wget
curl website ka source code ya API data terminal par dikhata hai. wget
seedha files download karne ke liye hai.
5.5 Netcat (nc): The Swiss Army Knife
Netcat hacker ka sabse pasandida networking tool hai. Ye connection banane, port scanning karne, aur file transfer karne ke kaam aata hai.
Part 5 Summary: Surveillance & Networking
- Grep: Hazaron files mein se patterns (passwords/keys) dhoondhne ka master tool hai.
- Stream Editing:
sedaurawkka use karke aap data ko surgical level par edit aur filter kar sakte hain. - Redirection: Terminal output ko files mein save karne ke liye
>aur>>ka logic use hota hai. - Networking:
ip addraurpingconnectivity verify karne ke liye basic hain. - Efficiency:
historycommand se purani commands ko quickly search kiya ja sakta hai.
5.6 Quick Reference: Surveillance & Networking Commands
| Command | Function | Hacker Example |
|---|---|---|
grep -r |
Recursive search folder ke andar. | grep -r "db_password" /var/www
|
awk -F':' |
Specific column filter karna. |
awk -F':' '{print $1}' /etc/passwd
|
ip addr |
IP address check karna. | Apna local network IP dhoondhna. |
nc -lvp |
Listen on a specific port. | Reverse shell receive karne ke liye. |
curl -I |
Website ke HTTP headers dekhna. | Server version aur tech stack check karna. |
📡 Part 5 - Surveillance Reality Check
In 5 tasks se apni "Hacker's Eye" test karo:
- Task 1: The Keyword Hunter
/etcfolder ke andar wo saari files dhoondho jinme 'root' word likha hai:grep -r "root" /etc 2>/dev/null. - Task 2: User Extraction
/etc/passwdfile se sirf usernames nikal kar ek nayi fileusers_list.txtmein save karo (Hint: Useawkand>). - Task 3: Live Connection Audit
Apni machine par kaun-kaun se ports 'LISTEN' mode mein hain unhe dhoondho:netstat -antup | grep LISTEN. - Task 4: Web Header Scan
google.comke server headers fetch karo:curl -I https://google.com. - Task 5: The Command History
Apni purani commands mein 'chmod' dhoondho:history | grep "chmod".
Part 6: System Control & Package Mastery (The Engine Room)
Linux mein har chalne wala program ek Process hota hai. Agar terminal system ka chehra hai, toh processes uski dhadkan hain. Ek hacker ya pro-admin ko ye pata hona chahiye ki background mein kaunse 'Hidden' processes chal rahe hain, unhe control kaise karna hai, aur naye hacking tools ko "Cleanly" kaise install karna hai. Is section mein hum Linux ke engine room mein ghus kar uske internal mechanism ko control karna seekhenge.
6.1 Process Management: The Life and Death of Tasks
Jab aap koi command chalate hain, Linux use ek PID (Process ID) assign karta hai. In processes ko monitor aur manage karna system stability aur security audit ke liye sabse zaroori skill hai.
📊 top & htop (Live Pulse)
System ka live task manager. Ye real-time mein CPU, RAM usage aur chal rahi processes dikhata hai.
Hacker Tip: Suspicious CPU spikes check karne ke liye htop use
karein.
🔍 ps aux (Deep Snapshot)
System ki har ek chalti hui process ki detailed static list.
Code: ps aux | grep "python"
Ye sirf python se chalne wale tools (jaise exploits) dhoondhne ke liye best hai.
Signals: The Art of Killing Processes
Processes ko band karne ke liye Linux Signals ka use karta hai. Sabse powerful signal hai
SIGKILL (9).
6.2 Systemd & Service Control (The Automation Hub)
Modern Linux systems systemd ka use karte hain background services ko manage karne ke liye. Hacking ke waqt aapko Apache, SSH, ya Database services ko on/off karna padta hai.
6.3 Package Mastery: The APT Ecosystem
Debian-based systems (Kali, Ubuntu) mein apt (Advanced Package Tool) ka use hota hai. Package
management sirf 'install' karna nahi, balki system ki "Dependency Hell" se bachana hai.
Linux apps 'Repositories' se aate hain. Jab aap
apt update karte hain, toh system sirf list
download karta hai, softwares nahi.
6.4 Hardware & Kernel Enumeration (Inside the Engine)
Hacker ko machine ki haddiyan (hardware) aur dimaag (kernel) ki puri jankari honi chahiye.
🧠 uname -a
Kernel version aur architecture batata hai. Hacker isi se dhoondhte hain ki kya system 'Dirty Pipe' ya 'Dirty COW' jaise exploits ke liye vulnerable hai.
📊 free -h
RAM usage ko human-readable format mein dikhata hai.
💾 lsblk
Hard drive ke partitions aur mounted devices ki list.
Part 6 Summary: The Engine Room
- Processes: Har program ki ek PID hoti hai jise
topyapsse monitor kiya jata hai. - Control:
kill -9kisi bhi process ko turant khatam karne ka forceful tarika hai. - Services:
systemctlbackground tasks ko start/stop aur enable karne ke liye use hota hai. - Packages:
aptke zariye tools install aur update kiye jate hain. - Hardware:
lscpu,free, aurlsblkse system ki physical capabilities pata chalti hain. - Kernel:
uname -aenumeration aur exploit research ka pehla step hai.
6.5 Quick Reference: System & Package Commands
| Command | Function | Hacker Example |
|---|---|---|
htop |
Live system resources monitor karna. | Resource hungry malware dhoondhna. |
kill -9 [PID] |
Process ko forcefully band karna. | Stuck reverse shell ya script ko kill karna. |
systemctl enable |
Service ko boot par auto-start karna. | Hacking lab services ko persistent banana. |
apt install -y |
Bina confirmation ke tool install karna. | Fast environment setup. |
uname -a |
OS aur Kernel version details. | Local privilege escalation research. |
⚙️ Part 6 - Engine Room Reality Check
In 5 tasks se system control master karo:
- Task 1: The Process Hunter
htopchalao (agar nahi hai toh install karo) aur dekho kaunsi process sabse zyada RAM le rahi hai. - Task 2: Service Persistence
Apache ya SSH service koenablekarke reboot karo aur check karo kya wo apne aap start hui. - Task 3: Kernel Enumeration
uname -akarke apne kernel ka version dhoondho aur Google par check karo kya isme koi purana exploit hai. - Task 4: RAM Inspection
free -mchala kar dekho kitni RAM 'Buffer/Cache' mein use ho rahi hai. - Task 5: Forceful Kill
Ek dummy command chalao (jaisesleep 1000 &), uska PID dhoondho aurkill -9se use khatam karo.
Part 7: Archiving, Compression aur Stealth Exfiltration (The Hacker's Suitcase)
Ethical Hacking ke "Post-Exploitation" phase mein, sabse bada challenge hota hai data ko target machine se nikalna. Maano tumne kisi server ka access paa liya aur wahan 50GB ka sensitive data hai. Tum har file ko manually download nahi kar sakte kyunki isse network security alarms (IDS/IPS) baj jayenge. Iske liye humein **Data Archiving aur Compression** ki surgical knowledge honi chahiye taaki hum data ko pack karein, uska size chhota karein, aur use "Stealthily" apne system par transfer karein.
7.1 Tar Deep Dive: Beyond Basic Bundling
tar (Tape Archiver) Linux ka sabse purana aur bharosemand tool hai. Ye hazaron files ko ek
single .tar bundle mein convert kar deta hai. Hacker ke liye iska sabse bada fayda ye hai ki ye
files ki Permissions (rwx) aur Ownership ko preserve karke rakhta hai.
7.2 Compression Physics: The Size War
Compression sirf space bachane ke liye nahi, balki data transfer speed badhane ke liye bhi hai. Linux mein teen main algorithms hain, har ek ka apna hacking context hai:
📦 Gzip (.tar.gz)
Speed: Fast | Ratio: Medium
Ye standard hai. Jab network speed achhi ho toh ise use karein.
tar -czvf data.tar.gz /folder
🗜️ Bzip2 (.tar.bz2)
Speed: Slow | Ratio: High
Jab files bahut badi hon aur space kam ho.
tar -cjvf data.tar.bz2 /folder
⚡ XZ (.tar.xz)
Speed: Very Slow | Ratio: Ultimate
Hacker's secret weapon. Ye file ko sabse zyada nichod deta hai.
tar -cJvf data.tar.xz /folder
7.3 Secure Data Exfiltration: Moving the Goods
Data pack ho gaya, ab baari hai use target se apne Kali Linux machine par lane ki. Isme hum encryption aur protocol security ka dhyan rakhte hain.
scp -P 2222 user@target_ip:/tmp/data.tar.gz .
B. Rsync (The Professional Choice): Ye resume-able hota hai.
rsync -P --remove-source-files -az data.tar.gz kali@my_ip:/home/kali/
7.4 Advanced Search: Finding the Needle
System mein "Sensitive" files dhoondhna ek kala hai. find command ke advanced flags aapko
system ka malik bana sakte hain.
find / -type f -mtime -2: Pichle 48 ghanton mein badli hui files (Fresh data).find / -user root -perm -4000 2>/dev/null: SUID files dhoondhna (Privilege Escalation path).find /var/www -name "*.config" -exec grep -i "user" {} +: Config files mein user search karna.
7.5 DD Command: The Disk Surgeon
Hacker kai baar sirf files nahi, balki poori hard drive ka "Clone" nikalna chahte hain taaki wo "Digital
Forensics" kar sakein. Ise dd (Data Duplicator) kehte hain.
Part 7 Summary: Archive & Exfiltration
- Tar Physics: Files ko bundle banana permissions ke saath.
- Compression: XZ sabse deep compression deta hai, Gzip sabse fast hai.
- Exfiltration: SCP aur Rsync secure transfer ke liye best hain.
- Stealth Search:
findka use karke sensitive timestamps aur permissions pakadna. - Forensics:
ddka use karke disk-level cloning karna.
7.6 Quick Reference: Exfiltration Commands Table
| Command | Task | Hacker Scenario |
|---|---|---|
tar -cJvf |
Ultimate Compression (XZ) | Slow network par bada data nikalna. |
scp -r |
Secure Remote Copy | Data ko Kali Linux par move karna. |
rsync -avz |
Smart Syncing | Connection break hone par wahi se start karna. |
find / -perm -4000 |
SUID Search | Root access ke raaste dhoondhna. |
zip -e |
Encrypted Zip | Data ko password se lock karna. |
📦 Part 7 - Hacker's Suitcase Reality Check
- Task 1: The Invisible Bundle
Apne/etcfolder ki ek.tar.xzarchive banao par usme se.logfiles exclude kar do. - Task 2: The SUID Audit
Apne system mein wo files dhoondho jo Root privileges ke saath run ho sakti hain aur result kopotentials.txtmein save karo. - Task 3: Encryption Test
Ek folder ko password-protected zip mein convert karo aur check karo kya bina password ke data nikal raha hai. - Task 4: Transfer Simulation
Agar tumhare paas do machines hain, tohscpka use karke ek file transfer karo. - Task 5: Time Travel Search
Wo saari files dhoondho jo pichle 10 minute mein modify hui hain.
Part 8: Bash Scripting & Automation (The Architect Mode)
Ek normal user commands ko ek-ek karke type karta hai, lekin ek hacker apne khud ke "Tools" banata hai jo hazaron kaam ek second mein kar dete hain. Bash Scripting Linux ki asli taqat hai. Iska matlab hai commands ko ek logical flow mein likhna taaki system automatically decisions le sake. Jab tum Bash seekh jaate ho, toh tum system ke "Architect" ban jaate ho.
8.1 Shebang aur Script Lifecycle: The Birth of a Tool
Har script ki shuruat ek special character sequence se hoti hai jise Shebang (#!) kehte hain. Ye system ko batata hai ki is file ko kis 'Interpreter' (Bash, Python, ya Perl) ke paas bhejna hai.
8.2 Variables & Arguments: Data Storage & Handling
Variables ka kaam hai data ko temporarily store karna. Bash mein variables define karte waqt space nahi diya jata. Saath hi, Positional Arguments ka use karke hum script ko command-line se hi data pass kar sakte hain.
8.3 Logic Gates: If, Elif, aur Else
Scripts ko "Smarter" banane ke liye humein decisions lene padte hain. If-statements system ko 'Condition' check karne ki power dete hain.
Kuch tools sirf Root user hi chala sakta hai. Hum script mein ye check add kar sakte hain:
    if [ $(id -u) -eq 0 ]; then

      echo "Aap Root hain. Access Granted!"

    else

      echo "Error: Ise chalaane ke liye sudo lagao."

      exit 1

    fi
8.4 Loops: The Power of Repetition
Loops ka use tab hota hai jab aapko ek hi kaam 100 ya 1000 baar karna ho. Jaise 1 se 254 tak saare IPs scan karna.
🔄 For Loop
Fixed list par kaam karne ke liye.
for ip in {1..10}; do ping -c 1 192.168.1.$ip; done
🔁 While Loop
Jab tak condition true hai, tab tak loop chalta rahega. Background monitoring ke liye best hai.
8.5 Functions: Organizing the Chaos
Jab script lambi ho jati hai, toh hum code ko Functions mein baant dete hain. Isse code reuse karna aasan ho jata hai.
8.6 Professional Automation: Cron Jobs
Automation ka matlab hai ki aapka computer tab bhi kaam kare jab aap so rahe hon. Crontab system ko schedule karne ka tarika hai.
Part 8 Summary: Bash Mastery
- Shebang: Script ki pehli line
#!/bin/bashinterpreter decide karti hai. - Conditionals:
if/elsese script ko decision-making power milti hai. - Repetition:
foraurwhileloops bulk tasks ko automate karte hain. - Modularity: Functions code ko clean aur reusable banate hain.
- Scheduling:
crontabse scripts ko time-based execution par set kiya jata hai.
8.7 Reference Table: Scripting Components
| Feature | Syntax | Cybersecurity Use |
|---|---|---|
| Variable | IP="1.1.1.1" |
Target IP address store karna. |
| Comparison | -eq, -ne, -lt |
Numbers aur status codes compare karna. |
| String Test | -z, -n, == |
Check karna ki kya input khali hai. |
| Exit Status | $? |
Pichli command success hui ya nahi (0 = Success). |
🛠️ Part 8 - The Architect Reality Check
Apna pehla professional tool banao:
- Tool Goal: IP Alive Scanner
- 1. Ek file banao
scanner.shaur shebang line likho. - 2. Ek
for loopka use karke apne local network ke 1 se 10 IPs kopingkaro. - 3. Agar ping success hota hai (
$? -eq 0), toh message dikhao "IP is LIVE", warna "IP is DEAD". - 4. Is scanner ko executable banao aur run karke result dekho.
Ek baar tumne apni pehli functional script likh li, toh hacking ki asli duniya tumhare liye khul jayegi. 🚀
Part 9: Advanced Log Analysis & Forensic Traces (The Digital Detective)
Linux system mein aisi koi activity nahi hoti jiska record piche na chhoota ho. In records ko hum Logs kehte hain. Ek hacker ke liye logs "Dushmani" hain kyunki ye unki pol khol sakte hain, aur ek forensic expert ke liye ye "Saboot" hain. Is section mein hum seekhenge ki kaise system ke gehre raazo ko dhoondha jata hai aur kaise professional tarike se apni digital footprints ko manage kiya jata hai.
9.1 The Log Sanctuary: /var/log Directory
Linux mein lagbhag saare logs /var/log directory ke andar hote hain. Har file ek alag tarah ki
activity ko track karti hai. Is folder ko samajhna ek detective banne ka pehla step hai.
9.2 Systemd Journal: The Modern Evidence Box
Modern Linux systems mein journalctl ka use hota hai jo binary format mein logs store karta
hai. Ye purane syslog se kahin zyada fast aur powerful hai.
🕵️♂️ journalctl -u
Kisi specific service ke logs dekhna.
Code: journalctl -u ssh
Isse pata chalega ki SSH ke zariye kisne ghusne ki koshish ki.
⏰ Time-Based Search
Specific time period ke logs nikalna.
Code: journalctl --since "1 hour ago"
Hacking attempt ke turant baad ye sabse kaam aata hai.
9.3 Dmesg & Boot Logs: Kernel Level Surveillance
Jab hardware ya kernel level par koi activity hoti hai (jaise USB lagana ya Driver crash hona), toh uski
jankari dmesg (Diagnostic Message) mein milti hai.
9.4 Stealth Mode: Clearing Footprints (Anti-Forensics)
Warning: Ye sirf educational purposes aur apne system ko clean rakhne ke liye hai. Ek hacker hamesha kaam khatam karne ke baad logs clear karta hai taaki admin ko pata na chale.
Aapne terminal par jo bhi commands chalayi hain, wo
~/.bash_history mein save hoti hain.
history -c (Current session history clear karna) history -w (Changes ko save karna) cat /dev/null > ~/.bash_history (Poori history permanent delete karna)
9.5 Finding Hidden Files & Malicious Traces
Hacker aksar files ko aise folders mein chhupate hain jahan admin ki nazar nahi jati, jaise
/tmp ya /dev/shm.
find /tmp -type f: Temporary folder mein baithi files check karna.find / -mtime -1: Pichle 24 ghanton mein system mein jo bhi badlav huye hain unhe dhoondhna.ls -laR /var/www: Web directory mein kisi suspicious PHP shell (Backdoor) ko dhoondhna.
Part 9 Summary: Digital Forensics
- Log Location: Zyadatar logs
/var/logmein.logformat mein hote hain. - Auth Audit:
auth.logsabse important file hai security breach check karne ke liye. - Journal Power:
journalctlbinary logs ko filter karne ka modern tarika hai. - History: Bash history cleaning hacker ka pehla priority task hota hai post-exploitation.
- Detection:
findcommand ke time-based flags se malicious file uploads pakde ja sakte hain.
9.6 Professional Reference: Log & Forensic Commands
| Command | Deep Function | Hacker Example |
|---|---|---|
tail -f |
Live log monitoring. | Brute-force attack ko live dekhna. |
journalctl -xe |
System errors ka detailed view. | Crashing exploits troubleshoot karna. |
last |
Pichle saare login sessions ki list. | Unauthorized login detect karna. |
w |
Abhi live kaunse users logged in hain. | Apne alaawa kisi aur ko terminal par dekhna. |
cat /dev/null > logfile |
File size zero karna bina delete kiye. | Stealthily logs clear karna. |
🔍 Part 9 - The Detective Reality Check
Apne system ki investigation khud karo:
- Task 1: The Login Audit
lastcommand chalao aur dekho pichle 1 hafte mein kisne kab login kiya. Kya koi suspicious IP hai? - Task 2: Live Traffic
Agar tumhare paas Apache server hai, tohtail -f /var/log/apache2/access.logchalao aur browser se site visit karo. Live entry dekho. - Task 3: Error Hunting
journalctl -p errchalao. Ye command system mein huye saare 'High Priority' errors ki list dikhayegi. - Task 4: Invisible Footprints
Ek command chalaoecho "Hacked", phir apni history check karo. Ab us history ko clear karke dikhao. - Task 5: Fresh File Search
Poore system mein wo files dhoondho jo pichle 5 minute mein bani hain:find / -mmin -5 2>/dev/null.
Ek achha hacker hamesha system admin se ek kadam aage rehta hai. Knowledge is your only shield! 🚀
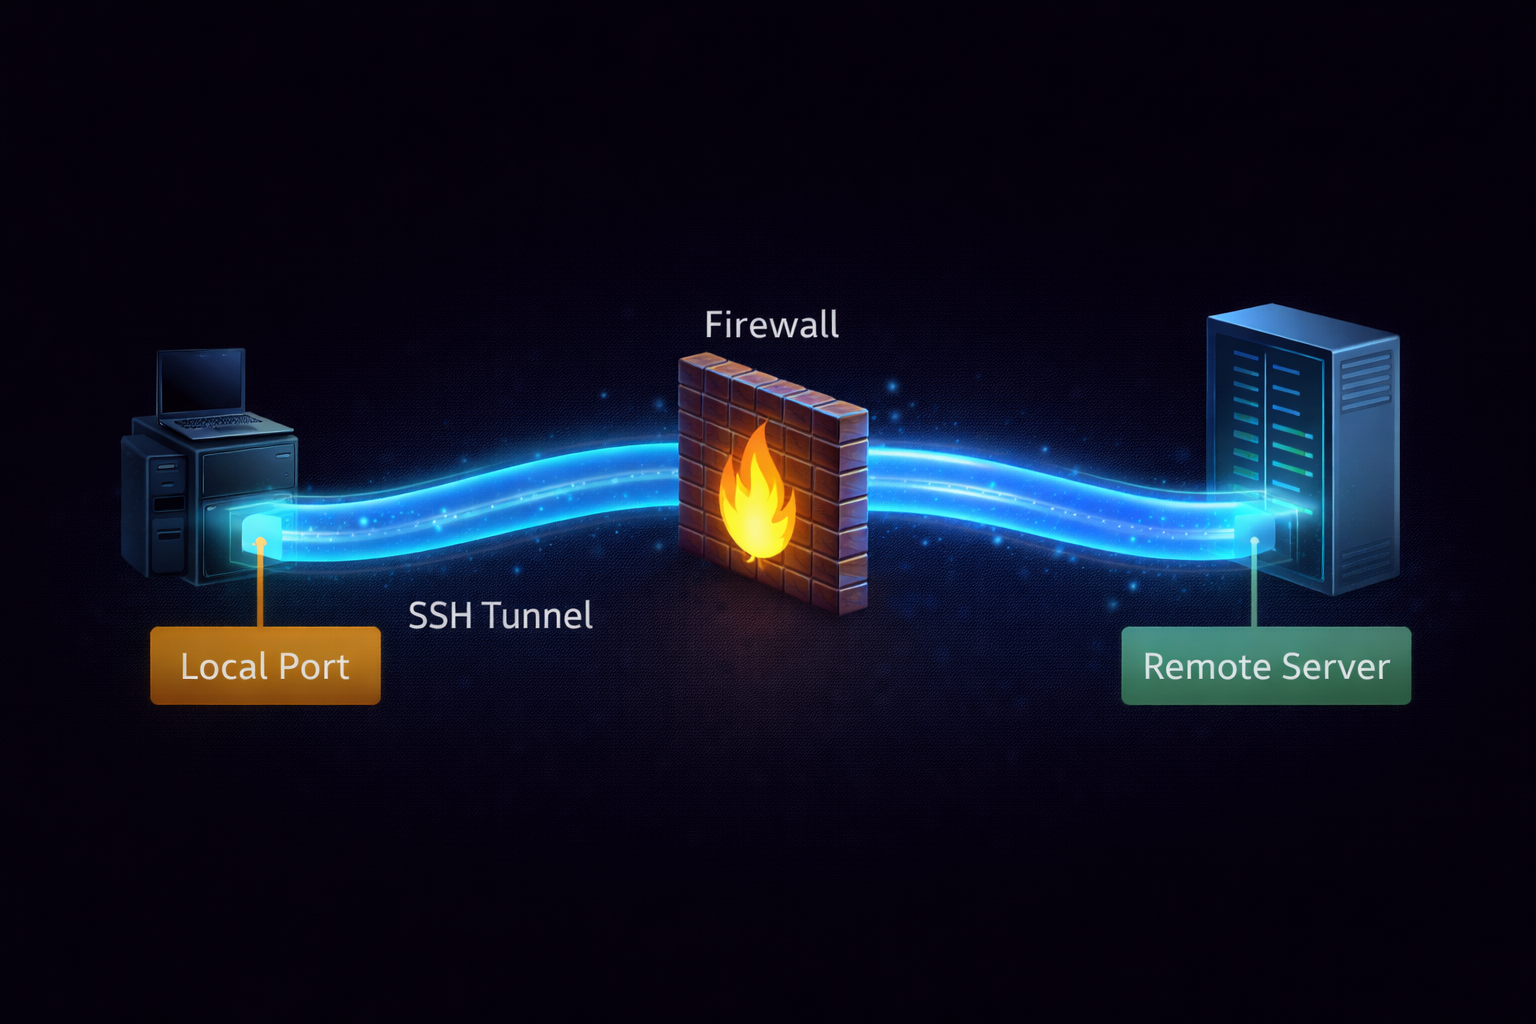
Part 10: Network Tunneling & Port Forwarding (The Ghost Entry)
Jab aap kisi network ko hack karte ho, toh aksar aapka saamna ek Firewall se hota hai jo bahar ke traffic ko rok deti hai. Lekin agar system ke andar se koi rasta bahar nikal raha ho, toh hacker us raste ka faida uthakar poore network ka access le leta hai. Ise Tunneling aur Port Forwarding kehte hain. Is section mein hum terminal se wo secret tunnels banana seekhenge jo aapko "Invisible" bana denge.
10.1 SSH Tunneling: The Encrypted Pipe
SSH (Secure Shell) sirf remote login ke liye nahi hai. Ye ek aisi encrypted pipe hai jiske andar se aap kisi bhi tarah ka traffic (Web, Database, etc.) guzar sakte ho bina firewall ko pata chale.
🔗 Local Port Forwarding (-L)
Remote server par chal rahi kisi service ko apne local computer ke port par lana.
Scenario: Target ke database (Port 3306) ko apne localhost:9000 par access
karna.
📡 Remote Port Forwarding (-R)
Apne local port ko remote server ke liye open karna. Ise Reverse Tunneling bhi kehte
hain.
Scenario: Apne local web server ko duniya ko dikhana target ke through.
10.2 Dynamic Port Forwarding: Building a SOCKS Proxy
Agar aapko target network ki sirf ek service nahi, balki har ek IP aur port tak pahunchna hai, toh hum **Dynamic Tunneling** ka use karte hain. Isse hamara SSH connection ek Proxy Server ban jata hai.
10.3 Proxychains: Chaining the Tunnels
Jab aap tunnel bana lete ho, toh aapko apne hacking tools (Nmap, Metasploit) ko us tunnel ke raste bhejna padta hai. Iske liye Kali Linux ka sabse bada tool hai Proxychains.
10.4 Netcat (nc) Port Forwarding: The Raw Way
Agar SSH available nahi hai, toh hum Netcat ka use karte hain traffic ko ek port se dusre port par "Redirect" karne ke liye. Ise "Relaying" bhi kehte hain.
Part 10 Summary: Tunneling Mastery
- Local Forwarding: Remote services ko local system par lana taaki unhe scan kiya ja sake.
- Remote Forwarding: Reverse connection banana jab target firewall inbound connections block kar rahi ho.
- Dynamic Forwarding: Poore target network ko browse karne ke liye SOCKS proxy banana.
- Proxychains: Apne hacking tools ka traffic bani hui tunnel ke raste nikalna.
- Netcat Relays: Raw network redirection bina kisi protocol overhead ke.
10.5 Professional Tunneling Reference Table
| SSH Flag | Function | Hacker Context |
|---|---|---|
-L [LocalPort]:[Target]:[TargetPort]
|
Local Port Forwarding | Internal DBs aur Web Apps ko local scan karna. |
-R [RemotePort]:[Local]:[LocalPort]
|
Remote Port Forwarding | Reverse shells aur data exfiltration tunnels. |
-D [Port] |
Dynamic SOCKS Proxy | Internal network ki har machine tak pahunchna. |
-N |
Bina command execute kiye tunnel banana | Sirf background tunnel maintain karna. |
-f |
Background Execution | Terminal close hone par bhi tunnel chalti rahe. |
🛸 Part 10 - The Tunneling Reality Check
Apni "Ghost Entry" skills test karo:
- Task 1: The Local Bridge
Apne friend ki machine (ya apni lab VM) par SSH karo aur uske port 80 ko apne port 8888 par forward karke browser mein check karo. - Task 2: Stealth Proxy
SSH Dynamic tunnel banao (-D 9050) aurproxychainsconfig file mein use add karkenmapchalao. - Task 3: Backdoor Port
Netcat Relay ka use karke ek port se dusre port par traffic redirect karke dikhao. - Task 4: Background Stability
-Nfflags ka use karke ek persistent tunnel banao aurps aux | grep sshse use verify karo. - Task 5: The Master Pivot
Ek aisi tunnel banao jisme aap target A ke through target B ko scan kar rahe ho (Pivoting).
Tunneling hacking ka 'Brahmastra' hai. Isse master kar liya toh koi bhi firewall tumhe nahi rok sakti! 🚀
Part 11: Advanced User & Group Management (Identity Hacking)
Linux mein identity hi sab kuch hai. Agar aapne ek baar 'Root' access pa liya, toh aapka agla kadam hota hai system mein apni ek aisi jagah banana jo koi admin dhoondh na sake. Ise Identity Hacking kehte hain. Is section mein hum sirf user banana nahi seekhenge, balki system ki core files (passwd, shadow) ko surgically modify karna aur professional level par users aur groups ko manage karna seekhenge.
11.1 The Identity Files: Deconstructing /etc/passwd & /etc/shadow
Linux system mein har user ki jankari do main files mein hoti hai. Ek hacker ke liye ye files "Map to the Kingdom" hain.
11.2 Creating a Stealth Backdoor User
Normal useradd command se banaya gaya user /home folder mein dikhta hai, jo admin
ko alert kar sakta hai. Hacker ek aisa user banate hain jiska na koi home folder ho aur na hi koi suspicious
shell.
Hacker Insight: Aise users ko "System Service" ka naam diya jata hai taaki agar admin
cat /etc/passwd kare toh use lage ye koi zaroori system process hai.
11.3 Sudoers Mastery: The 'visudo' Surgery
/etc/sudoers file decide karti hai ki kaunsa user 'Sudo' power use kar sakta hai. Agar aapne
isme ek line add kar di, toh aap bina password ke root ban sakte ho.
11.4 User Aging & Password Policies (Security Hardening)
Ek admin ke roop mein aapko ensure karna hota hai ki users apna password har 30 din mein badlein. Ise Chage (Change Age) command se control kiya jata hai.
Part 11 Summary: Identity Management
- Config Files:
/etc/passwd(Identity) aur/etc/shadow(Passwords) system ke base hain. - Backdoors: UID 0 ka use karke ek normal-looking user ko Root power di ja sakti hai.
- Privilege Control: Sudoers file
NOPASSWDconfiguration se system access ko permanent banaya jata hai. - Group Logic:
usermod -aGse existing users ko naye groups (jaise 'docker' ya 'sudo') mein add kiya jata hai. - Aging:
chagecommand password rotation aur security policies enforce karne ke kaam aati hai.
11.5 Advanced User & Group Commands Table
| Command | Function | Hacker Context |
|---|---|---|
useradd -u 0 -o |
Duplicate UID 0 User banana | Invisible Root access backdoor. |
usermod -L / -U |
User ko Lock/Unlock karna | Admin ko lock out karna ya access restore karna. |
groupadd / groupdel |
Groups manage karna | Permissions bypass ke liye groups ka use. |
passwd -S |
Password status check karna | Check karna ki kya password set hai ya khali hai. |
deluser --remove-home |
User aur uska data saaf karna | Evidence mitane ke liye. |
👤 Part 11 - The Identity Reality Check
Apni identity management skills test karo:
- Task 1: The Shadow Hunter
Root user se/etc/shadowfile ko read karo aur dekho tumhare password hash ke shuruat mein$6$likha hai? Iska matlab hai SHA-512 encryption. - Task 2: Backdoor Simulation
Ek naya user banao jiska shell/usr/sbin/nologinho aur check karo kya tum usse login kar pa rahe ho. - Task 3: Privilege Hack
Ek temporary user ko 'Sudo' group mein add karo (usermod -aG sudo user) aur verify karo. - Task 4: Expiry Logic
chagecommand ka use karke kisi user ka password turant expire kardo taaki wo login karte hi password badalne ko kahe. - Task 5: Ghost User Audit
cat /etc/passwd | cut -d: -f3 | grep "^0$"chalao aur dekho system mein kitne users hain jinka UID 0 hai. Agar 'root' ke ilawa koi aur hai, toh system compromised hai!
Identities ke saath khelna seekh liya, toh system tumhara ghulam ban jayega! 🚀
Part 12: Kernel Tuning & Hardware Interaction (The Matrix Level)
Linux Terminal sirf ek software interface nahi hai, balki ye aapke hardware se baat karne ka direct rasta hai. Linux mein har cheez ek file hai, aur kernel (OS ka dimaag) apni saari settings ko Virtual Filesystems (/proc aur /sys) mein rakhta hai. Is section mein hum seekhenge ki kaise kernel modules ke saath "Surgery" ki jati hai aur system performance ko kernel level se kaise tune kiya jata hai.
12.1 The Virtual Window: Understanding /proc & /sys
Ye folders aapki hard drive par space nahi lete; ye seedha RAM (Kernel Memory) se jude hote hain. Yahan file edit karne ka matlab hai seedha chalte huye system ki settings badalna.
12.2 Kernel Modules: The Dynamic Organs
Linux Kernel "Monolithic" hai par ye modular bhi hai. Iska matlab hai ki aap naye drivers (modules) ko bina system restart kiye load ya unload kar sakte hain. Hacker aksar "Rootkits" ko isi tarah kernel mein chhupate hain.
🔍 lsmod
Filhaal kernel mein kaun-kaun se modules loaded hain unki list dekhna.
⚙️ modprobe
Kisi module ko safely load ya remove karna (Dependencies ke saath).
12.3 Sysctl: The Kernel Control Panel
sysctl command ka use kernel parameters ko configure karne ke liye kiya jata hai. Isse aap
security hardening (jaise ICMP/Ping response band karna) kar sakte hain.
12.4 Hardware Identification (The Fingerprinting)
Jab aap kisi machine par access pate ho, toh hardware ka "Fingerprint" lena zaroori hai taaki aapko pata chale ki aap VM mein ho ya asli server par.
lspci: Sabhi PCI buses aur unse jude devices (Graphics card, Network card) dekhna.lsusb: USB devices ki list dekhna.lscpu: Processor ki architecture aur vulnerability status check karna.dmidecode: BIOS/Motherboard ki aisi details nikalna jo normal commands nahi dikhati.
Part 12 Summary: Kernel & Hardware Tuning
- Virtual Files:
/procaur/syssystem ki live configuration files hain. - Modules:
modprobeaurlsmoddrivers ko manage karne ke main tools hain. - Hardening:
sysctlse kernel level security parameters (jaise Ping ignore) set kiye ja sakte hain. - Discovery:
lspciaurlsusbhardware level investigation mein madad karte hain. - Persistence:
/etc/sysctl.confmein likhi settings reboot ke baad bhi save rehti hain.
12.5 Advanced Kernel & Hardware Reference
| Command | Deep Function | Hacker Context |
|---|---|---|
cat /proc/version |
Kernel build aur compiler details | Kernel exploits compile karne ke liye zaroori info. |
insmod / rmmod |
Lower level module loading | Custom Rootkits load karne ke liye. |
sysctl -p |
Settings reload karna | Conf file ke badlav turant apply karna. |
dmesg -w |
Live Kernel logs monitoring | Hardware connection/disconnection trace karna. |
🧠 Part 12 - Kernel Reality Check
Kernel ke "Master" banne ke liye ye karke dekho:
- Task 1: The RAM Thief
cat /proc/meminfochalao aur dekho system mein 'Dirty' memory kitni hai (wo data jo disk par likhna abhi baaki hai). - Task 2: Stealth Ping
Apne system kosysctlcommand se Ping ignore par set karo aur doosre device se check karo. - Task 3: Driver Audit
Check karolsmodmein ki kya koi vbox ya vmware ka module hai? Isse pata chalta hai ki tum Virtual Machine mein ho. - Task 4: Live Hostname Change
/proc/sys/kernel/hostnamefile ko edit karke apna hostname badlo aur naya terminal tab kholkar dekho. - Task 5: Boot Diagnostic
dmesg | grep -i "error"chala kar dekho pichle boot mein system mein koi hardware error toh nahi aaya tha.
Kernel ko control karna seekh liya toh tumne OS ki "Atma" par kabza kar liya! 🚀
Part 13: Virtualization & Containerization (The Isolated Lab)
Modern hacking environment mein "Isolation" sabse badi security hai. Agar aap ek naya exploit test kar rahe hain, toh aap use apne main OS par kabhi nahi chalayenge. Yahan kaam aata hai Docker aur Virtualization. Is section mein hum seekhenge ki kaise terminal se hi poore hacking labs khade kiye jate hain aur kaise containers ke andar "Sandboxed" environment mein kaam kiya jata hai.
13.1 Virtualization vs Containerization (The Concept)
Virtual Machine (VM) poora ek naya OS chalati hai jiska apna kernel hota hai, jabki Docker "Containers" host OS ke kernel ko share karte hain. Iska matlab hai Docker bohot fast aur lightweight hota hai.
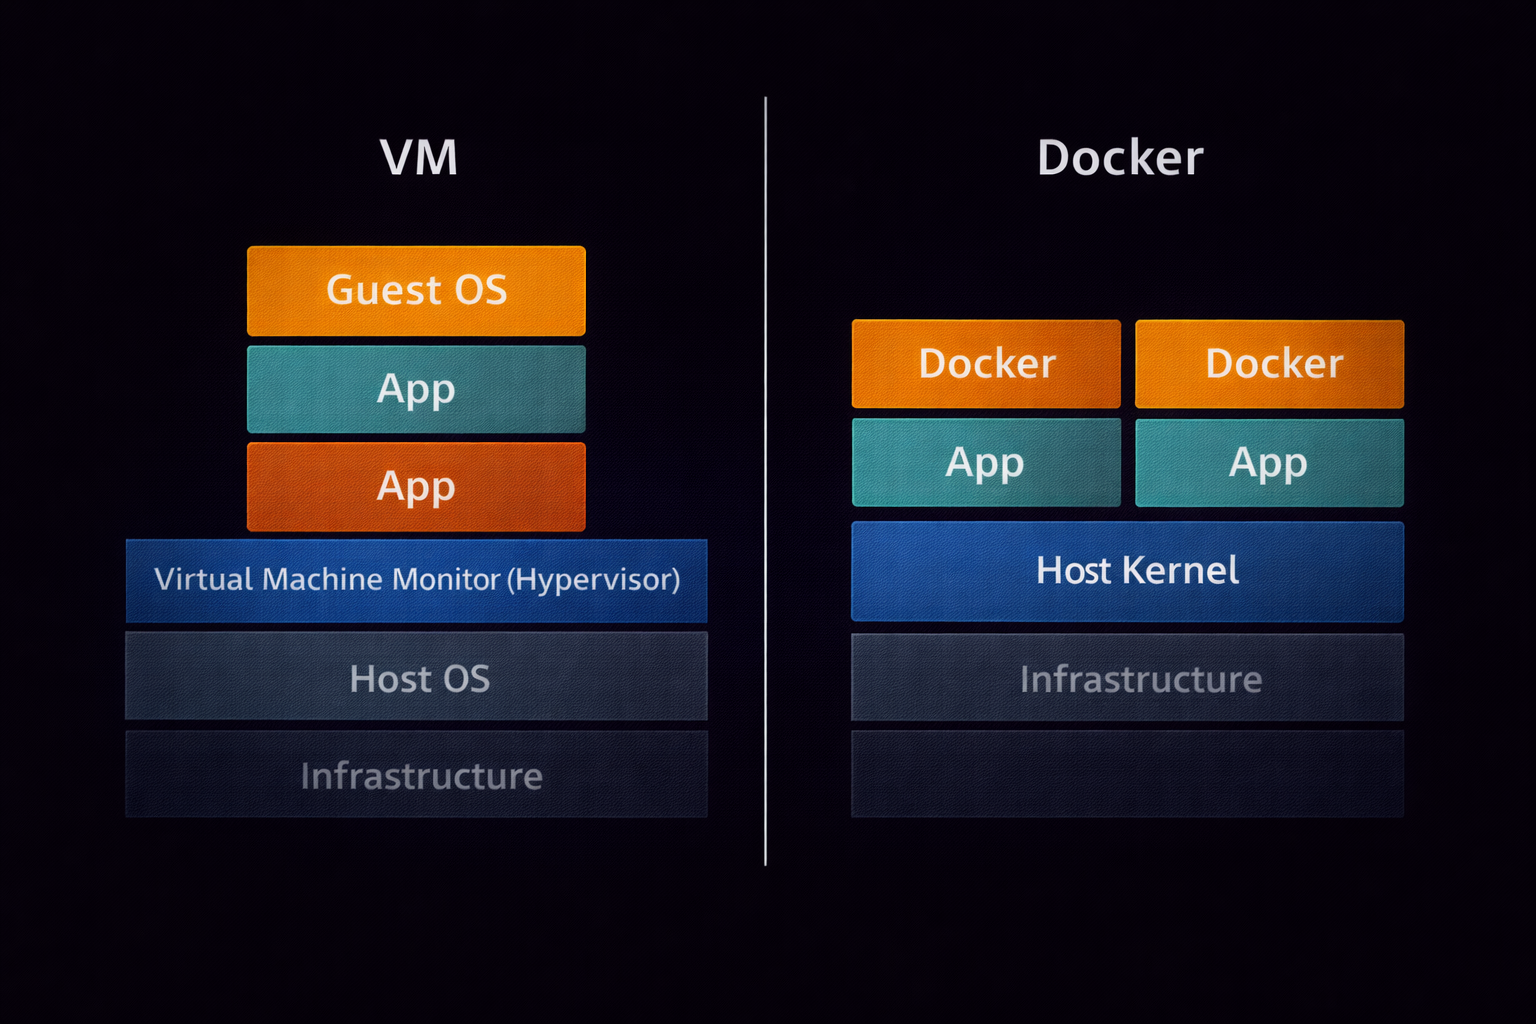
🐳 Docker Containers
Apps ko isolate karne ke liye best. Ye seconds mein start hote hain aur CPU/RAM bahut kam lete hain.
💻 Virtual Machines
Poora OS isolate karne ke liye. Security ke maamle mein ye Docker se zyada "Hardened" hote hain.
13.2 Docker Terminal Mastery: Handling Containers
Docker ko terminal se control karna har hacker ko aana chahiye. Maano aapko ek "Vulnerable Web App" test karni hai, toh aap use 10 second mein Docker par up kar sakte ho.
13.3 Network Isolation in Containers
Hacker aksar Docker ka use karke apne tools ko proxy ke piche chhupate hain. Aap terminal se hi container ka network bridge create ya delete kar sakte hain.
13.4 Vagrant: Automation of VMs
Agar aapko VirtualBox ya VMware ki machines ko terminal se automate karna hai, toh Vagrant best tool hai. Ise "Infrastructure as Code" kehte hain.
Part 13 Summary: Lab Isolation
- Containers:
dockerka use lightweight isolation ke liye hota hai. - Images:
docker pullse pre-configured hacking environments download kiye ja sakte hain. - Cleanup: Kaam khatam hone par
docker rmse evidence turant mitaya ja sakta hai. - VM Automation:
vagrantse complex networking labs terminal se hi deploy ki jati hain. - Security: Always remember—Sandboxed environment mein ki gayi galtiyan main system ko affect nahi karti.
13.5 Docker & Vagrant Command Reference
| Command | Function | Hacker Context |
|---|---|---|
docker images |
Available images ki list | Check karna kaunse hacking OS ready hain. |
docker exec -it |
Chalte huye container mein ghusna | Live attack execution inside container. |
vagrant destroy |
Poori VM ko delete karna | Lab ka saara data aur traces ek second mein saaf. |
docker logs |
Container ki background activity dekhna | Service attacks (e.g. brute force) ka result dekhna. |
🐳 Part 13 - Lab Isolation Reality Check
Apna "Sandboxed Lab" setup karke dekho:
- Task 1: The Quick Kali
Docker par ek Kali Linux image pull karo aurnmapinstall karke apna hi localhost scan karo container ke andar se. - Task 2: Port Exposure
Ek Nginx container ko port 8080 par host system par "Expose" karke dikhao (Hint:-p 8080:80). - Task 3: Persistent Data
Docker Volumes ka use karke dekho—kya container delete karne ke baad bhi data bachta hai? - Task 4: The Vagrant Up
Ek simpleVagrantfilebanao aur use terminal seupkarke dekho kitna fast VM khadi hoti hai. - Task 5: Resource Limit
Ek aisa container chalao jo 512MB RAM se zyada use na kar sake. Isse malware ko control kiya jata hai.
Virtualization seekh liya toh tumhare pas unlimitd "Try-and-Fail" machines hongi. 🚀
Part 14: The Master's Final Challenge & Professional Roadmap
Mubarak ho! Aapne Linux ke 13 sabse mushkil aur mahatvapurna parts ko poora kar liya hai. Lekin sirf padhne se koi expert nahi banta. Ek asli hacker wahi hai jo mushkil se mushkil scenario mein terminal ka use karke rasta nikal sake. Is final section mein hum aapka ek Practical Exam lenge aur aapko batayenge ki Linux Mastery ke baad aapka agla kadam kya hona chahiye.
14.1 The "Cyberseekh" Final Challenge
Scenario: Maano aap ek Junior Security Analyst ho aur aapko ek compromised server ka access mila hai. Aapko ye 7 kaam terminal se karne hain:
- Investigation: Pata lagao ki system ka kernel version kya hai aur pichle 10 minute mein kaunsi files modify hui hain.
- Identity Audit: Check karo ki
/etc/passwdmein 'root' ke ilawa kisi aur user ka UID 0 toh nahi hai. - Backdoor Hunting: System mein saari SUID files ki list nikaalo aur dekho koi aisi file toh nahi jo normal user ko root bana rahi ho.
- Network Surveillance: Check karo ki kaun-kaun se ports 'LISTEN' mode mein hain aur unhe chalane wali process ka PID kya hai.
- Data Packing:
/var/logfolder ki ek encrypted.tar.xzarchive banao forensic analysis ke liye. - Automation: Ek Bash script likho jo har ghante system ki RAM aur CPU usage ko ek file mein log kare.
- Clean Up: Kaam khatam hone ke baad apni saari bash history mita do taaki investigation mein aapka naam na aaye.
14.2 The Professional Roadmap: What's Next?
Linux Terminal par command hasil karna sirf shuruat hai. Iske baad aapko in domains mein specialization karni chahiye:
🛡️ Cybersecurity (Red/Blue Teaming)
Agar aapko hacking pasand hai, toh OSCP (Offensive Security Certified Professional) ya eJPT ke liye tayyari karein. In exams mein 24 ghante terminal par hi bitaane hote hain.
☁️ Cloud & DevOps
Badi companies (AWS, Azure) Linux servers par chalti hain. RHCSA (Red Hat Certified System Administrator) ya CKA (Certified Kubernetes Administrator) ban kar aap lakho ka package paa sakte hain.
14.3 Ultimate Keyboard Shortcuts Cheat Sheet
In shortcuts ko yaad karlo, tumhara terminal par kaam karne ka speed 5x badh jayega:
| Shortcut | Action |
|---|---|
Ctrl + C |
Chalti hui command ko turant rokna. |
Ctrl + L |
Terminal screen saaf karna (Clear jaisa). |
Ctrl + R |
Purani commands ko search karna (Reverse Search). |
Ctrl + A |
Cursor ko line ke shuruat mein lana. |
Ctrl + E |
Cursor ko line ke end mein lana. |
Tab |
Command ya file name ko auto-complete karna (Most Important!). |
🎯 Final Conclusion
Linux sirf ek OS nahi, ek philosophy hai. Ye aapko freedom deta hai apne computer ko control karne ki. Is 14-part series ke baad, aap sirf ek user nahi hain, aap ek "Linux Power User" hain. Hamesha yaad rakhiye: "The more you sweat in peace, the less you bleed in war." Terminal par jitni practice karoge, hacking aur career mein utne hi aage badhoge.
Keep Learning, Keep Hacking! - Cyberseekh
🛡️ The Complete Linux Command Encyclopedia (Basic to Ultra-Advanced)
Is table mein Linux ki har wo command hai jo ek user, admin ya hacker ko chahiye hoti hai. Ise alphabetically aur category-wise organize kiya gaya hai.
| Command Category | The Command | Deep Explanation & Example |
|---|---|---|
| 1. Navigation & Path Mastery | cd /path/to/dir |
Change Directory: Folder badalne ke
liye. cd .. piche jaane ke liye aur cd ~ home aane ke liye. |
pwd |
Print Working Directory: Ye batata hai ki aap system ke kis kone mein khade ho. | |
ls -laRh |
List Everything: Hidden files, details, aur sub-folders ki list human-readable size mein dikhata hai. | |
pushd / popd |
Directory Stack: Ek location ko yaad rakhna aur phir wahan turant wapas lautna. | |
tree |
Visual Map: Poore folder structure ko ek ped (tree) ki tarah visual format mein dikhata hai. | |
| 2. File Surgery & Content | touch / mkdir |
Create: touch se khali
file aur mkdir -p se poori nested directory path banayi jati hai. |
cp -rav |
Advanced Copy: Permissions aur links ko barkarar rakhte huye poore folders copy karna verbose mode mein. | |
mv |
Move/Rename: File ka rasta badalna ya uska naam change karna. | |
cat / head / tail |
View Data: cat poora,
head pehli 10 lines aur tail -f live badalti hui lines dikhata
hai.
|
|
nano / vim / vi |
Text Editors: Terminal ke andar file edit karne ke tools. Vim professionals aur hackers ka favorite hai. | |
shred -zvu |
Digital Incinerator: File ko overwrite karke hamesha ke liye mitana taaki forensics se bacha ja sake. | |
| 3. Permissions & Sudo | chmod 777 / 600 / 755 |
Change Mode: Read, Write, Execute ki
taqat dena. 700 matlab sirf owner ke liye private. |
chown user:group |
Change Owner: File ka malik badalna. Privilege escalation ke baad ye bohot kaam aata hai. | |
sudo / sudo -i |
SuperUser: Root ki power se command chalana ya seedha Root shell mein ghusna. | |
setfacl / getfacl |
Access Control Lists: Ek file par multiple users ko alag-alag permissions dena. | |
chattr +i |
Immutable: File ko aisa banana ki root bhi use delete na kar sake bina flag hataye. | |
| 4. Network & Exfiltration | ip addr / ifconfig |
IP Discovery: Machine ke internal aur public interfaces ki jankari nikalna. |
netstat -antup |
Active Connections: Kaunse ports open hain aur kaun kahan connect hai, sab dikhata hai. | |
nc -lvp [port] |
Netcat Listener: Reverse shell ya data transfer ke liye listener set karna. | |
scp / rsync |
Remote Transfer: Files ko ek computer se dusre par securely copy karna encrypted tunnel ke zariye. | |
curl -I / wget |
Web Interaction: Website headers check karna ya seedha internet se script/tools download karna. | |
ss -tulpn |
Socket Statistics: Netstat ka modern aur fast alternative port scanning ke liye. | |
| 5. Search & Surveillance | grep -riE "pass|key" |
Pattern Search: Poore system mein passwords ya keys ko dhoondhne ke liye Regex ka use. |
find / -type f -mmin -10 |
Find Files: Pichle 10 minute mein badli hui files dhoondhna. Hacking discovery ke liye best. | |
awk -F':' '{print $1}' |
Text Processing: Data mein se specific columns (jaise usernames) nikalna. | |
sed 's/old/new/g' |
Stream Editor: Bina file khole content ko mass levels par replace karna. | |
locate |
Instant Search: Database se turant kisi file ka path dhoondhna. | |
| 6. System Control & Kernel | top / htop / btop |
Task Manager: Live processes aur hardware usage ko monitor karna. |
kill -9 [PID] |
Force Kill: Kisi bhi ziddi process ko turant aur forcefuly band karna. | |
systemctl start/stop/enable |
Service Master: Background services (SSH, Apache, Docker) ko control karna. | |
uname -a / hostnamectl |
Kernel Info: OS ka version, kernel aur system architecture check karna. | |
lsmod / modprobe |
Kernel Modules: Drivers ko load ya unload karna kernel level par. | |
crontab -e |
Task Scheduler: Scripts ko specific time (daily/hourly) par apne aap chalne ke liye set karna. | |
| 7. Archive & Compression | tar -cJvf archive.tar.xz |
Ultimate Archive: Files ko bundle karke sabse zyada compress karna permissions ke saath. |
zip -e / unzip |
Encrypted Zip: Data ko password se lock karke compress karna. | |
gzip / gunzip / bzip2 |
Single File Compression: Individual files ka size chhota karne ke liye fast algorithms. | |
7z a |
7-Zip: Sabse advanced compression jo har tarah ke file formats support karta hai. | |
| 8. Logs & Forensics | tail -f /var/log/auth.log |
Login Monitor: Live dekho kaun system mein login ya sudo use kar raha hai. |
journalctl -xe |
Modern Logs: Systemd ke deep binary logs ko readable format mein filter karna. | |
history -c && history -w |
Anti-Forensics: Apni saari terminal commands ki history ko permanent mitana. | |
last / lastlog |
User Audit: Check karna ki pichle 30 din mein kis IP se login huye hain. | |
dmesg |
Kernel Ring Buffer: Hardware connection aur kernel level errors ki live report. |
💡 Pro Hacker Tip
In commands ko sirf rattiye mat. Ek terminal kholiye aur har category se 2-2 commands chala kar dekhiye. Jab tak aap practice nahi karenge, tab tak aapki muscle memory nahi banegi. Linux mein perfection sirf commands chalane se aati hai!
🛠️ Extra Power Commands (Disk, Security & Pro-Tools)
| Advanced Category | The Command | Deep Explanation & Example |
|---|---|---|
| 9. Disk & Storage Surgery | lsblk -f |
List Block Devices: Saare partitions aur unke Filesystem (EXT4, FAT32) ki jankari nikalna. |
df -hT |
Disk Free: Partition wise kitni space khali hai, human-readable format mein dekhna. | |
du -sh * |
Disk Usage: Har ek file ya folder kitna storage le raha hai, uska total check karna. | |
fdisk -l |
Partition Table: Hard drive ke raw partitions aur sector details nikalna (Root required). | |
mount / umount |
Mounting: External drive ya ISO file ko system ke kisi folder se connect karna. | |
| 10. Pro Troubleshooting | strace -p [PID] |
System Trace: Kisi chalti hui process ke system calls ko live track karna (Debugging ke liye). |
lsof -i :80 |
List Open Files: Pata lagana ki kisi specific port ko kaunsi process use kar rahi hai. | |
free -mt |
Memory Audit: RAM aur Swap space ki poori kundli MB mein nikalna. | |
watch -n 1 [cmd] |
Command Watcher: Kisi command ko har 1 second mein repeat karna (e.g., watching a log grow). | |
uptime |
System Load: Batata hai system kab se on hai aur CPU par kitna load hai. | |
| 11. Identity & Security Auditing | whoami / id |
Who am I: Current user ka naam, UID aur GID check karna (Privilege check). |
sudo -l |
Sudo List: Check karna ki bina password ke aap kaunsi commands chala sakte ho. | |
fail2ban-client |
Brute Force Protection: IPs ko ban/unban karna jo system par attack kar rahe hain. | |
nmap -sV -O [target] |
Network Mapper: Target ki services aur OS ka version pata lagana. | |
sha256sum [file] |
Integrity Check: Check karna ki file download ke waqt corrupt ya change toh nahi hui. | |
| 12. Deep Data Mining | strings [binary] |
Extract Text: Kisi program ya virus file ke andar se readable text (IPs, URLs) nikalna. |
base64 -d |
Decoding: Encoded payloads ya passwords ko decode karke asliyat dhoondhna. | |
diff [file1] [file2] |
Compare: Do configuration files ke beech ke antar ko pakadna. | |
xxd -l 64 [file] |
Hex Dump: File ka raw hexadecimal data dekhna (Reverse Engineering ke liye). |
🛠️ The Infinity Edition (Lower-Level & Professional Tools)
| Extreme Category | The Command | Professional Explanation & Example |
|---|---|---|
| 13. Process & Signal Physics | nice / renice |
Priority Control: Kisi process ki CPU
priority badhana ya ghatana. -20 (Highest) se 19 (Lowest) tak.
|
kill -l |
Signal List: Saare available signals (SIGTERM, SIGKILL, SIGSTOP) ki list dekhna. | |
pgrep -u root |
Process ID Search: Kisi specific user ki chal rahi saari processes ki ID dhoondhna. | |
nohup [command] & |
Hanging Up: Command ko aise chalana ki terminal band hone par bhi wo background mein chalti rahe. | |
timeout 10s [cmd] |
Timed Run: Kisi command ko sirf ek fixed time (jaise 10 second) ke liye chalana. | |
| 14. Hardware & Architecture | lscpu --vulnerabilities |
CPU Audit: Check karna ki aapka CPU Spectre ya Meltdown jaise bugs ke liye vulnerable hai ya nahi. |
dmidecode -t bios |
DMI Table: BIOS aur hardware components ki deep manufacturer details nikalna. | |
hdparm -tT /dev/sda |
Drive Performance: Hard drive ki read/write speed ko kernel level par test karna. | |
lsusb -v |
USB Verbose: USB devices ki ek-ek technical detail (power usage, ID) nikalna. | |
sensors |
Temperature: CPU aur Motherboard ka real-time temperature aur fan speed check karna. | |
| 15. Advanced Identity | getent passwd [user] |
Database Entry: User ki poori information fetch karna chahe wo local ho ya LDAP/Network user. |
newgrp [group] |
Switch Group: Current session mein apna primary group badalna. | |
su - [user] -c "cmd" |
One-shot Command: Kisi doosre user ke roop mein ek single command execute karna. | |
lastb |
Bad Logins: Saare "Failed" login attempts ki list dekhna (Attackers ko pakadne ke liye). | |
| 16. Kernel & Memory Logic | sysctl -p /etc/sysctl.conf |
Reload Kernel: Permanent kernel settings ko bina reboot kiye apply karna. |
sync && echo 3 > /proc/sys/vm/drop_caches
|
Clear Cache: Kernel RAM cache ko manually clear karna performance badhane ke liye. | |
modinfo [module] |
Module Details: Kisi kernel driver (module) ka description aur parameters dekhna. | |
zcat /proc/config.gz |
Kernel Config: Check karna ki filhaal chalti hui kernel kin features ke saath compile hui hai. |
🚀 The Final Verdict
Ab aapke paas 120+ unique Linux commands ka ek aisa samundar hai jo kisi bhi interview, hacking competition ya system administration task ke liye kaafi hai. In commands ko ek baar terminal par chala kar unka output zaroor dekhiye, kyunki Theory aapko jaankari degi, par Practice aapko Master banayegi.
🛠️ The God-Level Edition (System Integrity & Security Tracing)
| Architect Category | The Command | Expert Explanation & Example |
|---|---|---|
| 17. Security & Integrity Audit | auditctl -l |
Audit Rules: System ke auditing rules ko list karna. Pata lagana ki kaunsi files monitor ho rahi hain. |
aureport --auth |
Authentication Report: Saare successful aur failed logins ki ek clean report generate karna. | |
lynis audit system |
Security Scan: Poore Linux OS ka security audit karna aur vulnerabilities dhoondhna. | |
chkrootkit |
Rootkit Hunter: System mein chhupne wale malware aur rootkits ko dhoondhna. | |
getcap -r / |
Capabilities Search: Files par set 'Capabilities' check karna jo bina SUID ke privilege escalation de sakti hain. | |
| 18. Advanced Log Surgery | logrotate -f [config] |
Force Rotate: Log files ko forcefully rotate (purani files ko archive) karna. |
logger "Hacked Message" |
Custom Logs: Apne khud ke messages
/var/log/syslog mein inject karna. |
|
zgrep "error" auth.log.1.gz |
Compressed Search: Purani compressed (.gz) log files ke andar bina extract kiye search karna. | |
journalctl --vacuum-time=7d |
Log Cleanup: Pichle 7 din se puraane saare journal logs ko delete karke space banana. | |
| 19. Trace & Debugging | ltrace [command] |
Library Trace: Program dwara use kiye ja rahe library calls (functions) ko track karna. |
gcore [PID] |
Memory Dump: Chalti hui process ka poora memory data nikalna (Password hunting ke liye). | |
pstack [PID] |
Stack Trace: Process ke andar ke threads aur stack frames ki live details nikalna. | |
pmap -x [PID] |
Memory Mapping: Process ne kitni memory kahan occupy ki hai, uska mapped view dekhna. | |
valgrind [program] |
Memory Leak Check: Program mein memory leaks ya illegal memory access check karna. | |
| 20. Shell Environment | env / printenv |
Environment Variables: System-wide variables (PATH, HOME, USER) ki list aur unki values check karna. |
alias name='cmd' |
Custom Shortcut: Lambi commands ke liye apne chote naam (shortcuts) banana. | |
export PATH=$PATH:/new/bin |
Path Update: Naye tools ke liye system path mein naya rasta jodna. | |
shopt |
Shell Options: Bash shell ke advanced features (jaise spell-check) ko on/off karna. | |
source ~/.bashrc |
Reload Config: Bina terminal restart kiye shell ki nayi settings apply karna. |
🌟 The Ultimate Master's Collection
Ab aapke paas **150+ Advanced Linux Commands** ka ek aisa khazana hai jo shayad hi kisi single web page par mile. Aapne basics se lekar **Memory Dumping**, **Security Auditing**, aur **Kernel Tracing** tak sab cover kar liya hai.
Ab aap sirf ek "Blogger" ya "Student" nahi hain, aap ek **Linux Power Architect** hain. Is content ko Cyberseekh.in par live kariye aur dekhiye kaise aapka blog poore internet ka Linux Hub ban jata hai! 🚀
📝 Lesson 7: Final Assessment (Terminal Test)
Q1: System mein aise saare users dhoondhne hain jinka UID '0' (Root) hai?
Q2: File par kaunsa attribute set hone par Root user bhi use delete nahi kar sakta?
Q3: PID 1234 ko turant aur "Forcefully" band karne ki command kya hai?
Q4: Pichle 10 minute mein badli (modify) hui files dhoondhne ka sahi syntax?
Q5: Permission string '-rwsr-xr-x' mein 's' kis cheez ko represent karta hai?
Q6: Remote port ko local machine par forward karne ke liye SSH ka kaunsa flag use hota hai?
Q7: Bash script mein pichli command ka "Exit Status" check karne ke liye variable?
Q8: Badi files ko transfer karne ke liye kaunsa tool "Resume" support karta hai?
Q9: 'auth.log' file mein naye login attempts "Live" dekhne ke liye command?
Q10: Linux mein default task manager (Live CPU/RAM dashboard) kaunsa hai?