
Part 1: Kali Linux - The Digital God Mode (Deep Dive)
Movies mein aapne dekha hoga ki hacker ek kaali screen par hare rang (green) ke codes type karta hai. Wo
Kali Linux hai. Lekin sachai sirf "Black Screen" tak seemit nahi hai.
Kali Linux kya hai? (Beyond the Basics)
Technically, ye ek Debian-based Linux Distribution hai. Lekin ye sirf ek OS nahi, ye ek
"Weaponized Ecosystem" hai.
Normal Linux (jaise Ubuntu) "Daily Driver" hota hai, lekin Kali Linux ko Offensive Security
(OffSec)
ne design kiya hai sirf ek maqsad ke liye: To Break Things.
Iske andar 600+ Pre-installed Tools hain jo categories mein divided hain:
- Information Gathering: Target ka janm-kundli nikalna (Nmap, Maltego).
- Vulnerability Analysis: System ki kamzori dhundna (Nessus).
- Wireless Attacks: WiFi todna (Aircrack-ng).
- Sniffing & Spoofing: Beech mein baatein sunna (Wireshark, Ettercap).
Agar Windows ek "Luxury Sedan" hai jo sadak par aaram se chalne ke liye bani hai, to Kali Linux ek "Armored Tank" hai jo off-road jakar diwaar todne ke liye bana hai.
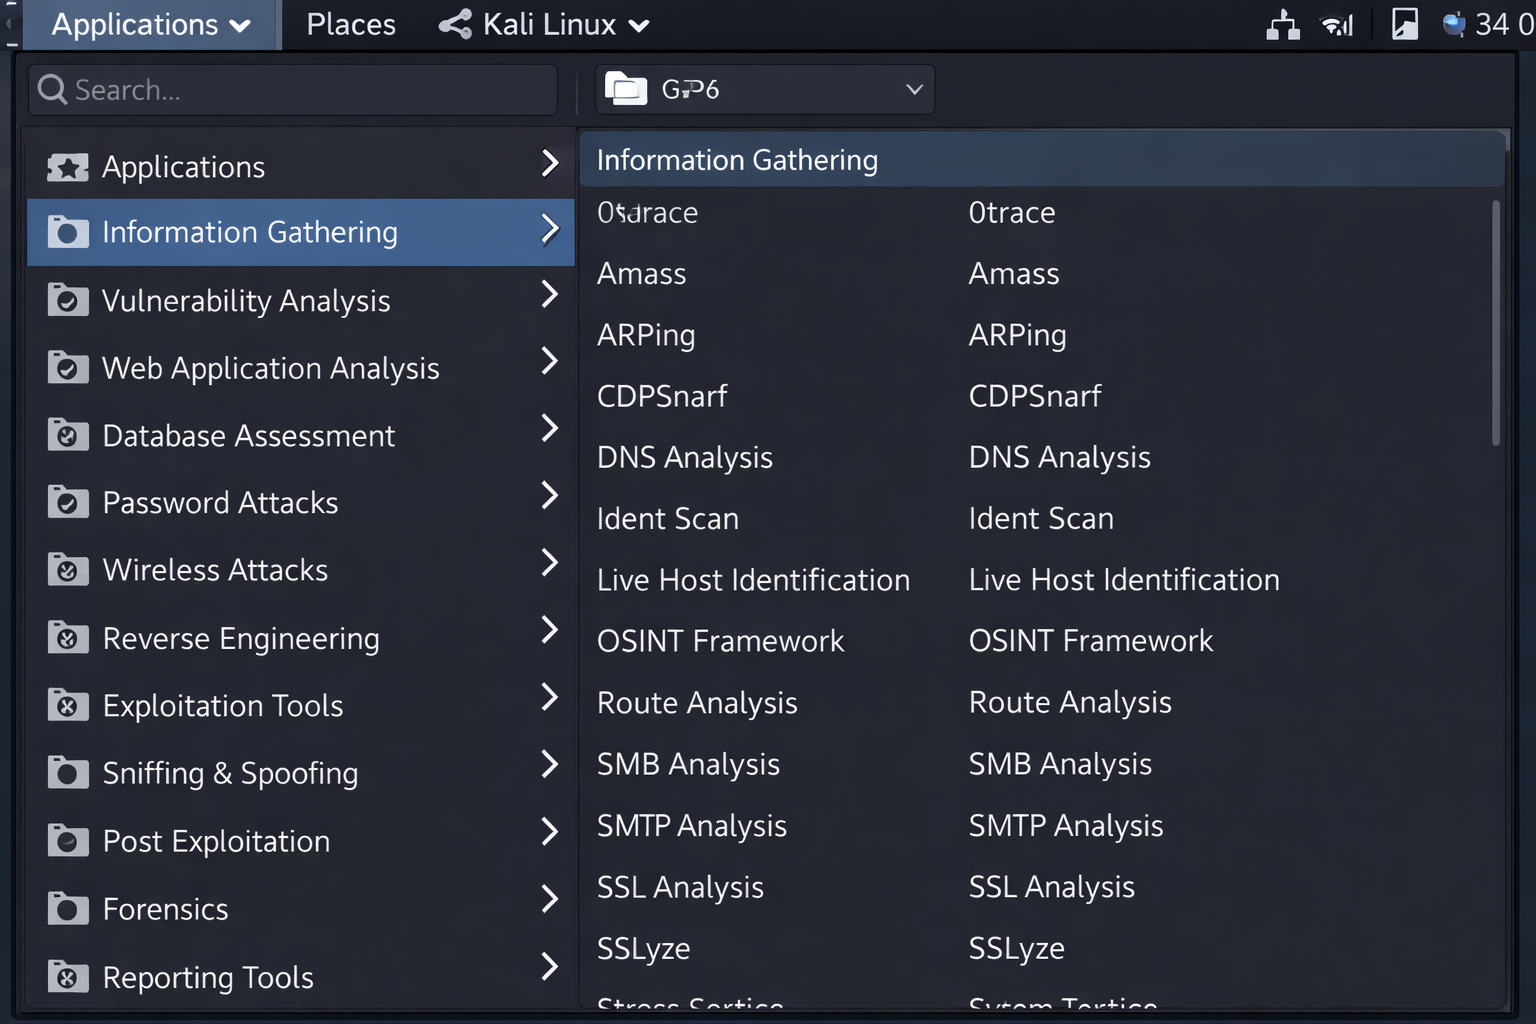
600+ Tools ko in 14 Categories mein organize kiya gaya hai.
The Architecture: Why Not Ubuntu? (Technical Breakdown)
Bohot log (aur beginners) sochte hain: "Main Ubuntu install karke uspar apt install aircrack-ng
kyu nahi kar leta?"
Jawab hai: Modified Kernel aur Patched Drivers.
1. The Custom Kernel (The Heart)
Normal OS (Windows/Ubuntu) ka kernel "Stability" aur "Battery Life" ke liye banaya jata hai. Wo anjaan
packets ko DROP kar deta hai.
Kali Difference: Kali ka Kernel specifically "Packet Injection" ke liye
patch kiya gaya hai.
Example: Agar aapko kisi network par Deauthentication Attack (User ko WiFi se kick karna) karna
hai, to aapke card ko raw packets bhejne honge. Ubuntu ka driver kahega "Ye standard protocol nahi hai" aur
block kar dega. Kali ka driver kahega "Go ahead, Master."
2. The Bleeding Edge Repos vs LTS
Ubuntu LTS (Long Term Support) focus karta hai purane, stable software par.
Kali Difference: Kali ek Rolling Release model hai.
Agar Metasploit ne aaj subah koi naya "Zero-Day Exploit" database mein add kiya, to Kali user ko wo
shaam tak update mil jayega. Hacking mein "Old Tools" ka matlab hai "Failed Attack".
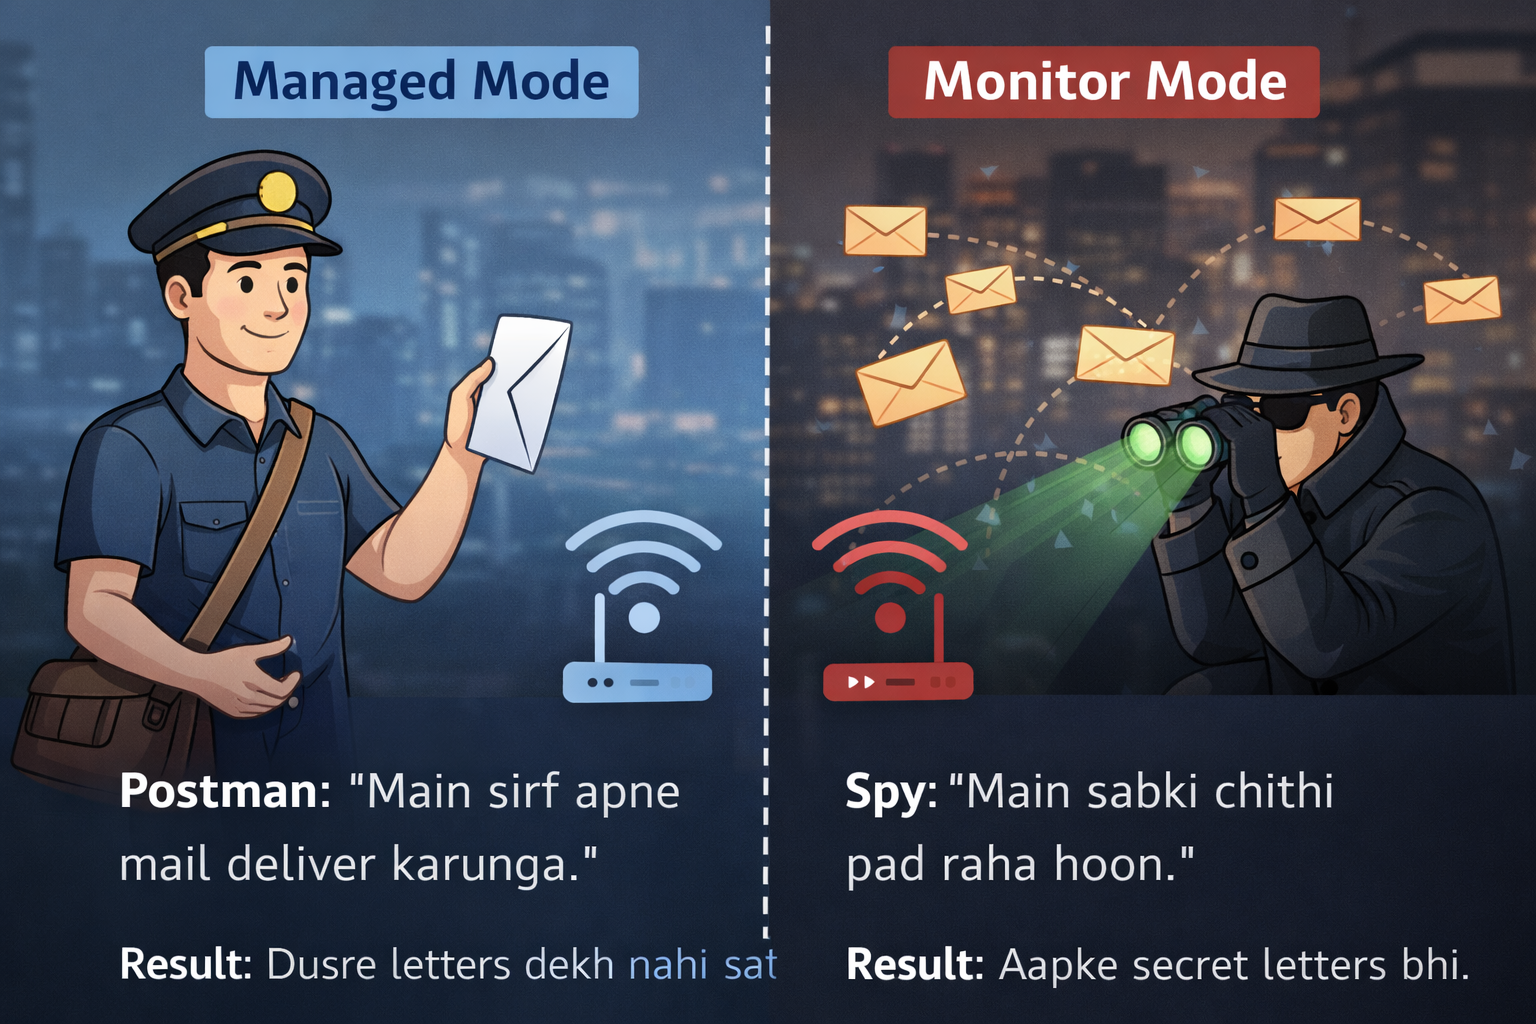
Deep Dive: Monitor Mode & The "Promiscuous" Logic
Kali ki sabse badi taqat hai Hardware ko control karna. WiFi Hacking ka sabse important concept yahi hai. Ise ek real-world analogy se samjhein.
Which Desktop Environment? (Xfce vs GNOME)
Jab aap Kali download karte hain, to wo aapse poochta hai. Ye choice aapke hacking style ko define karti hai.
- Xfce (Default & Lightweight): Ye purane laptops par bhi rocket ki tarah chalta hai. Hackers ise pasand karte hain kyunki ye RAM kam khata hai. Jitni zyada RAM bachegi, utni zyada speed se aap Hashcat par password crack kar payenge.
- GNOME (Modern & Heavy): Ye MacOS jaisa dikhta hai. Agar aapke paas powerful PC (16GB+ RAM) hai, tabhi ise use karein.
2020 se pehle, Kali mein aap default Root (God) user hote the.
Problem: Agar aap browser chala rahe hain aur kisi malicious site par gaye, to us site ko bhi 'God Access' mil jata tha aur wo aapka system uda sakti thi.
Solution: Ab Kali mein aap "Standard User" hote hain. Power paane ke liye:
sudo su (SuperUser DO, Switch User)
Password:
kali
Ab prompt $ se badal kar # ho jayega. # means Danger/Power.
Part 2: Why Hackers HATE Windows? (The Technical Truth)
Aap soch rahe honge: "Main hacking tools Windows par kyun nahi chala sakta? Aakhir wo bhi to computer
hai."
Sach ye hai ki Windows ko "Consumer-First" banaya gaya hai, jahan OS aapko galti karne se rokta
hai.
Lekin Hacking ka matlab hi hai "System ki limits ko todna."
The Fundamental Difference: Admin vs Root
Windows mein "Administrator" hone ka matlab hai aap "Building ke Manager" hain (Rules follow karne honge).
Linux mein "Root" hone ka matlab hai aap "Building ke Maalik" hain (Aap chaho to building gira bhi sakte ho).
Ek hacker ko system ke "Nuts and Bolts" (Kernel level network stack) tak access chahiye hoti
hai, jo Windows block kar deta hai.

The 3 Technical Blockers (Deep Dive)
1. The "Raw Socket" Nightmare
The Tech: Normal internet usage (Chrome/YouTube) mein OS packet banata hai (IP Header + TCP
Header). Hacking tools (Nmap/Scapy) ko Custom Packets banane padte hain (jisme hum source
IP badal sakein ya fake flags laga sakein).
The Windows Problem: Windows XP SP2 ke baad, Microsoft ne security ke naam par
Winsock API mein Raw Sockets ko restrict kar diya.
Example: Agar aap SYN Scan (Stealth Scan) karna chahte hain, to Windows networking
stack beech mein aa jayega aur bolega "Ye packet standard protocols follow nahi kar raha" aur use drop kar
dega. Kali Linux kernel aapko packet ke har bit ko edit karne deta hai.
2. The Antivirus War (Cat & Mouse)
The Tech: Jab aap Metasploit se koi Payload (Virus) banate hain, to wo binary code
hota hai.
The Windows Problem: Windows Defender ab "Real-time Protection" use karta hai. Jaise hi aap
payload compile karenge, wo milliseconds mein gayab ho jayega.
Frustration: Hacking seekhte waqt aap aadha time Defender ko disable karne, exclusions set karne
aur firewall rules banane mein barbaad kar denge. Kali Linux mein koi rok-tok nahi hai—wo jaanta hai ki aap
hacker hain, victim nahi.
3. Dependency Hell & Compilers
The Tech: Bohot saare hacking tools C, C++, Ruby ya Python mein likhe gaye hain aur wo
Linux libraries par depend karte hain.
The Windows Problem: Agar aap koi tool install karte hain, to error aayega: "Microsoft
Visual C++ 14.0 is required." Phir aap 4GB ka compiler download karenge, phir 'Path Variables' set
karenge.
Linux Solution: Kali mein apt install toolname likhte hi dependencies, libraries aur
compilers automatic setup ho jate hain.
Real-World Scenario: "The Packet Injection Test"
Chaliye ek WiFi Deauthentication Attack (kisi ko WiFi se kick karna) ka example lete hain. Dekhte hain jab aap ye attack Windows par try karte hain to Kernel level par kya hota hai.
| Feature | Windows OS 🛑 (The Wall) | Kali Linux ✅ (The Key) |
|---|---|---|
| 1. Driver Access (HAL) | Windows ka Hardware Abstraction Layer (HAL) drivers ko control karta hai. WiFi chip sirf "Managed Mode" mein rehti hai (Sirf apna data bhejo/receive karo). | Linux Kernel drivers ko directly "Monitor Mode" mein shift kar deta hai. Chip ab "Promiscuous" ho jati hai (Hawa mein udne wala har signal capture karo). |
| 2. Packet Crafting (Injection) | Blocked by NDIS. Windows ka Network Stack (NDIS) aapko custom 802.11 Management Frames (jo router ko control karte hain) banane ki permission nahi deta. | Unrestricted. Tools jaise Aireplay-ng fake "Deauth Packets" bana kar router ko bhej sakte hain. Router ko lagta hai user ne disconnect kiya hai. |
| 3. Debugging & Errors | Cryptic Errors: "Error 0x8004005" ya "Unknown Exception". Windows errors ko chupata hai taaki user confuse na ho. | Logical Errors: "ioctl(SIOCSIFFLAGS) failed: Operation not possible due to RF-Kill". Linux saaf batata hai ki hardware switch off hai. |
Bohot students sochte hain: "Main WSL 2 install kar leta hoon, wo bhi to Linux hai."
Technical Catch: WSL 2 ek virtual kernel use karta hai lekin Network ke liye wo abhi bhi Windows ke 'Bridge' par depend karta hai. Iska matlab:
1. Aap USB WiFi Adapter ko direct access nahi kar sakte.
2. Aap Bluetooth Hacking nahi kar sakte.
Isliye, hardware hacking ke liye WSL bekaar hai. Hamesha Virtual Machine (VMware/VirtualBox) ya Dual Boot use karein.
Part 3: The Linux File System (The Hacker's Atlas)
Agar aap Windows se aa rahe hain, to sabse bada culture shock ye hoga: Linux mein C:\,
D:\ drives nahi hoti.
Windows mein storage physical drives par based hoti hai. Linux mein storage ek Logical Tree
hoti hai.
Yahan sab kuch ek single point se shuru hota hai jise hum Root (/) kehte hain.
Chahe aap pendrive lagayein ya hard disk, sab isi tree ki ek "Branch" ban jate hain.
The Golden Rule: Linux mein "Everything is a File." Aapka keyboard, mouse, aur WiFi
card bhi Linux ke liye bas ek file hai.

Deep Dive: The Directories That Matter
Ek Hacker poore system mein nahi ghoomta. Wo seedha un folders mein jata hai jahan "Khazana" (Passwords/Configs) ya "Saboot" (Logs) hote hain.
1. /bin vs /sbin (The Weapons)
/bin (User Binaries): Yahan wo commands hoti hain jo sab use kar sakte hain. Example:
ls, cp, cat.
/sbin (System Binaries): Yahan wo dangerous tools hote hain jo sirf Root
(Admin) use kar sakta hai.
Example: ifconfig (Network change karna), fdisk (Drive format karna),
reboot.
2. /etc (The Brain & Registry)
Windows mein "Registry" hoti hai jo complex database hai. Linux mein Text Files hoti hain.
Hacker's Interest:
/etc/passwd: Users ki list.
/etc/shadow: Encrypted Password Hashes. (Sabse bada target).
/etc/proxychains.conf: IP address chupane ki settings.
3. /var & /tmp (The Evidence)
/var/log: Yahan system ke saare logs (saboot) store hote hain.
Tip: Hack karne ke baad sabse pehle hacker /var/log/auth.log delete karta hai
taaki login traces mit jayein.
/tmp: Temporary files. Yahan permission loose hoti hain, isliye hackers aksar apne
Exploits yahi download karte hain.
The "Device File" Concept (/dev)
Ye concept samajhna zaroori hai. Linux hardware ko bhi file maanta hai.
Agar aap user "Rahul" hain, to aapki files
/home/rahul mein hongi. Aap kisi aur user ke folder mein
nahi jhank sakte.
Lekin /root folder administrator ka private kila hai. Wahan koi nahi ja sakta (siwaye Root ke).
CTF Tip: Capture The Flag games mein "Flag" aksar
/root/flag.txt mein hota hai.
Part 4: Terminal Mastery (The Black Screen)
GUI (Graphical User Interface) aam logo ke liye hai. Hackers **CLI (Command Line Interface)** use karte hain.
Kyun? Kyunki mouse se click karne mein waqt lagta hai. Terminal mein aap ek command se 10,000 files ko 1 second
mein rename, delete ya edit kar sakte hain.
Chaliye Linux Terminal ko 4 Levels mein master karte hain.
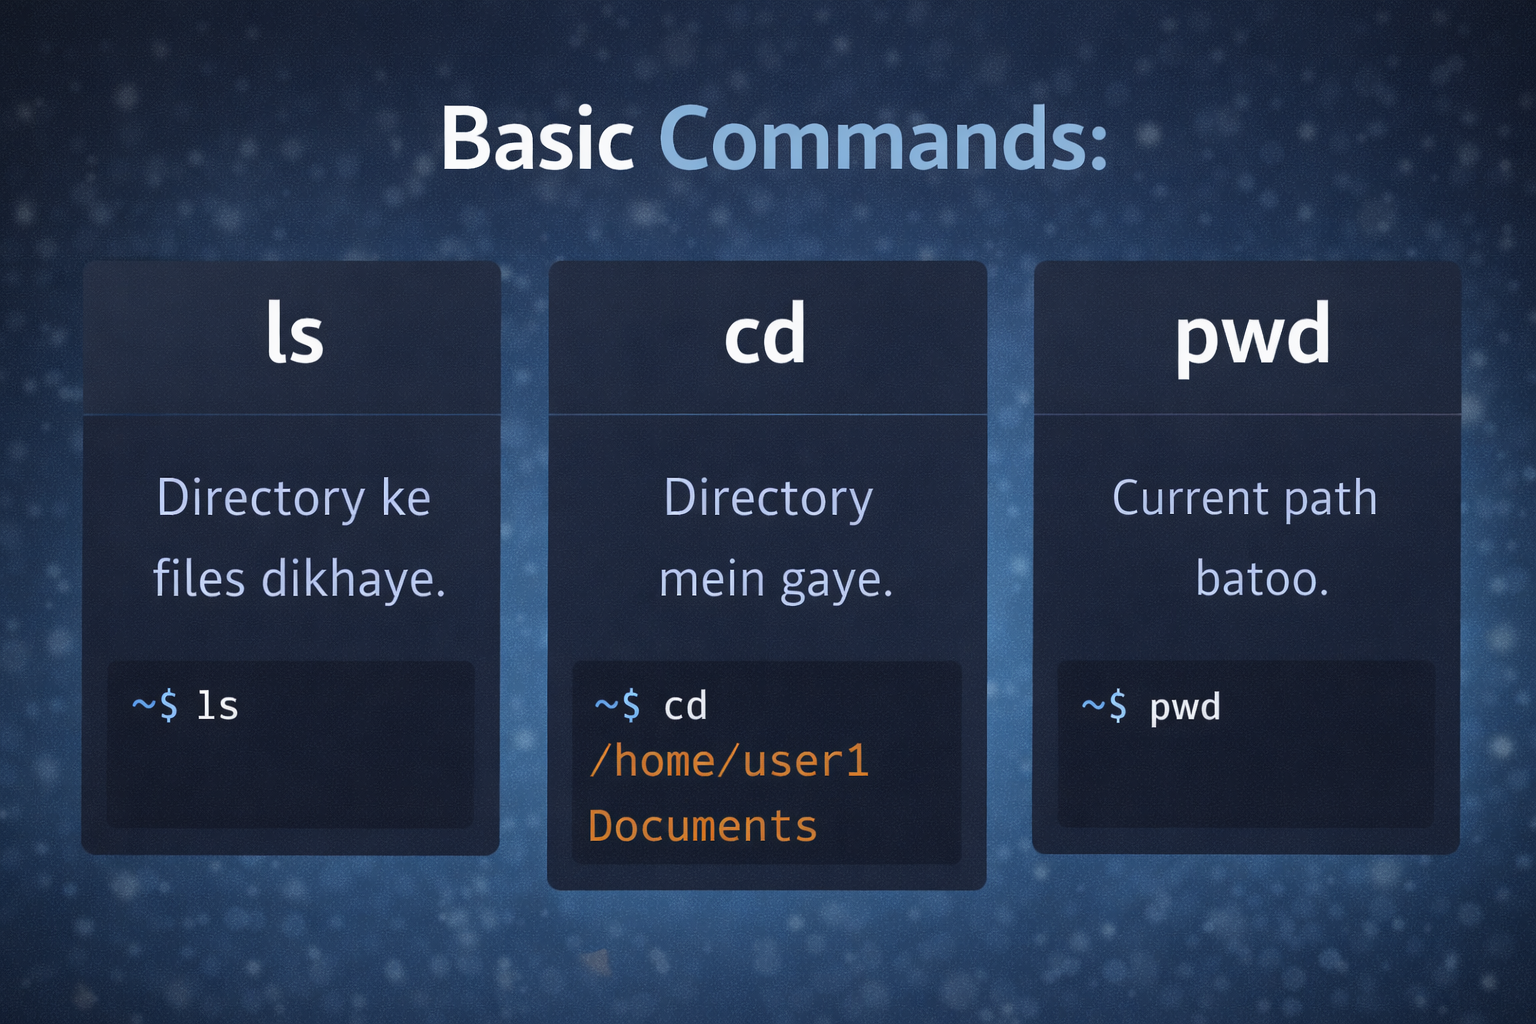
Level 1: Navigation (GPS System)
Terminal mein aap "andhe" hote hain. Aapko commands se dekhna padta hai.
Level 2: Creation & Destruction (God Mode)
Making Things
mkdir hacking_tools
-> Naya folder banata hai.
touch exploit.py
-> Ek khali file create karta hai.
nano exploit.py
-> Terminal ke andar text editor kholta hai code likhne ke liye.
Destroying Things (Warning!)
Linux mein "Recycle Bin" nahi hota. Delete matlab Delete.
rm file.txt
-> File delete karega.
rm -rf foldername
-> Recursive (folder ke andar sab kuch) + Force (Bina puche).
Warning: Kabhi bhi rm -rf / run mat karna, poora OS ud jayega.
Level 3: The Power of "Pipes" & "Grep"
Ye wo level hai jahan aap "Pro Hacker" ban'te hain. Pipe (|) ek command ka output
dusri command ko deta hai.
Level 4: Permissions (chmod Math)
Linux mein har file ke paas 3 permissions hoti hain:
Read (r) = 4 | Write (w) = 2 | Execute (x) = 1
Total = 7 (God Mode).
| Command | Math Calculation | Meaning |
|---|---|---|
chmod 777 file |
4+2+1 (User) | 4+2+1 (Group) | 4+2+1 (Others) | Dangerous. Duniya mein koi bhi is file ko edit/delete kar sakta hai. |
chmod 700 file |
7 (User) | 0 (Group) | 0 (Others) | Private. Sirf main (Owner) use karunga, baaki sab blocked. |
chmod +x script.py |
Add Execute (+1) | The Most Used. Jab aap internet se exploit download karte hain, wo chalta nahi hai jab tak aap use "Executable" (+x) na bana dein. |
Agar permission denied ka error aaye, to command ke aage
sudo lagayein.
Example:
sudo apt update.
Sudo ka matlab hai "SuperUser Do". Ye one-time admin pass hai.
Part 5: Top 3 Tools Deep Dive (The Holy Trinity)
Kali Linux mein 600+ tools hain, lekin ek professional Pentester apna 90% waqt sirf in 3 tools par bitata hai.
Agar aapne inhe master kar liya, to aap 80% hacker ban gaye.

1. Nmap (The Network Mapper)
Role: The Scout (Jasoos).
Attack karne se pehle aapko pata hona chahiye ki target ke ghar (Server) mein kitne darwaze (Ports) khule hain
aur kaunsa chowkidar (Version) wahan khada hai.
Understanding Output
Open: Darwaza khula hai. Attack yahan hoga.
Closed: Darwaza band hai.
Filtered: Firewall beech mein hai. Nmap confuse hai.
2. Metasploit Framework (The Weapon)
Role: The Soldier.
Agar Nmap ne bataya ki "Windows 7 ka port 445 khula hai", to Metasploit us port par missile (Exploit) fire
karega.
Structure: Exploit (Missile) + Payload (Bomb ke andar ka chemical).
3. Wireshark (The CCTV)
Role: The Analyst.
Ye tool attacks nahi karta, ye bas chupchap baith kar network ki taaren (wires) sunta hai. Ise Packet
Sniffing kehte hain.
The "HTTP" Trap
Agar koi user HTTP (Non-Secure) website par login karta hai, to Wireshark uska password
plain text mein dekh sakta hai.
Filter to use:
http.request.method == "POST"
(Ye sirf login forms dikhayega jahan user ne submit button dabaya hai).
Part 6: Virtualization - The Hacker's Safe House
Kali Linux ko kabhi bhi apne main computer (Host) par directly install mat karo (Dual Boot), khas kar agar aap
beginner hain.
Why?
Hacking tools unstable hote hain. Agar aapne galti se system folder uda diya, to aapka Windows data hamesha
ke liye chala jayega.
Isliye hum Virtual Machine (VM) use karte hain. Ye "Computer ke andar ek aur Computer" hai.
Agar VM mein virus aa jaye, to bas file delete karo, aapka main laptop (Host) safe rahega.

The "Snapshot" Superpower
Real life mein "Undo" button nahi hota, lekin VM mein hota hai.
Koi bhi dangerous attack ya update karne se pehle Snapshot le lo.
Scenario: Aapne update kiya aur Kali crash ho gaya.
Solution: "Restore Snapshot" par click karo, aur aap time mein peeche chale jaoge, jab sab kuch sahi
chal raha tha.
Deep Dive: Networking Modes (NAT vs Bridged)
Ye sabse confusing part hai. Agar aapko victim se connection wapas (Reverse Shell) nahi mil raha, to 99% galti yahi hai.
1. NAT (Network Address Translation)
Default Mode.
Yahan Kali Linux aapke Windows ke peeche chupa hota hai.
Analogy: Hotel Room. Aap reception (Host) ke through bahar call kar sakte hain, lekin bahar
wala aapko direct call nahi kar sakta.
Use Case: Surfing, Downloading Tools, Updating Kali.
Problem: Agar aap Victim ko payload bhejte hain, to Victim connect back nahi kar payega
kyunki router Kali ko dekh hi nahi sakta.
2. Bridged Adapter (The Hacker Mode)
Attack Mode.
Yahan Kali Linux Router se direct IP address mangta hai. Wo network par ek alag device ban jata hai.
Analogy: Apna khud ka ghar. Aapka apna address hai. Koi bhi aapke darwaze par direct aa
sakta hai.
Use Case: Reverse Shells, ARP Spoofing, MITM Attacks.
Benefit: Victim aur Kali ek hi level par hote hain.
Virtual Machine aapke Laptop ka internal WiFi card use nahi kar sakti.
VMware/VirtualBox us card ko "Wired Ethernet" bana kar dikhate hain.
Agar aapko WiFi hack karna hai, to aapko External USB WiFi Adapter (jaise TP-Link WN722N) khareedna padega jo "Monitor Mode" support kare aur use VM mein attach karna padega.
Part 7: The First 3 Rituals (System Setup & Hardening)
Kali Linux install karte hi "Hacking" shuru mat karo. Ek naya Kali system "Kachha" (Raw) hota
hai.
Professional Hackers aur Script Kiddies mein yahi fark hai: Script Kiddies seedha tools chalate hain aur error
aane par atak jate hain. Professionals system ko pehle "Battle Ready" banate hain.
Ye 3 Rituals (Rasm) wo foundation hain jiske bina aapka hacking career shuru hone se pehle hi crash ho jayega.
Ritual 1: Feed the Repository (The Update Architecture)
Beginners sirf apt update likhte hain kyunki tutorial mein dekha tha. Professionals samajhte hain
ki wo command background mein kya kar rahi hai.
Kali Linux Rolling Release model par chalta hai. Windows ki tarah yahan saal mein ek bada
update nahi aata; yahan har ghante nayi vulnerabilities ke patches aur naye tools push hote hain.
Deep Dive: The "Menu Card" Analogy
Linux mein software install karne ka tareeka App Store jaisa nahi hota. Ye ek Repository
(Repo) system use karta hai.
Imagine karo ek restaurant:
- /etc/apt/sources.list: Ye wo file hai jisme restaurant ka address likha hai (Kali ke servers ka link).
- apt update: Ye waiter ko bulakar sirf "Menu Card" check karna hai. Aapne khana order nahi kiya, bas ye check kiya ki aaj kya naya dish (tool) aaya hai.
- apt full-upgrade: Ab aapne waiter ko bola, "Jo bhi dish mere table par purani ho gayi hai, use replace karke nayi wali lao." Ye actual downloading aur installation hai.
Ritual 2: Hardening (Closing the Backdoors)
The Horror Story: Aap kisi victim ko hack karne ki koshish kar rahe hain, aur usi waqt koi aur
hacker aapke system mein ghus gaya. Kaise? Kyunki aapka password kali tha.
Default credentials (kali:kali) puri duniya ko pata hain. Agar aap public Wi-Fi par hain aur aapki SSH service
on hai, to aapka system 5 second mein compromise ho sakta hai.
sudo systemctl stop sshRitual 3: Workflow Velocity (Terminator & ZSH)
Hacking speed aur multitasking ka khel hai. Real-world penetration testing mein aapko ek saath 4 kaam karne hote
hain:
1. Attack run karna.
2. Server logs padhna.
3. Network traffic monitor karna.
4. Notes banana.
Standard terminal mein aapko 4 alag windows kholne padenge. Terminator aapko ek hi screen ko
tukdo (splits) mein todne ki power deta hai.
| Feature | Standard Terminal | Pro Hacker Setup (Terminator + Aliases) |
|---|---|---|
| Visibility | Alt+Tab karte reh jaoge. Context loose ho jata hai. | Single Window view. Left mein attack, Right mein output. Sab aankhon ke samne. |
| Efficiency | Bar bar lambi commands type karni padti hain. | Aliases (Custom Shortcuts) use hote hain. |
| Shell Power | Bash (Old school, kam features). | ZSH (Autosuggestions, Plugins, History search). |
# 1. Update System in one word
alias update='sudo apt update && sudo apt full-upgrade -y && sudo apt autoremove -y'
# 2. Install tool quickly (usage: ins nmap)
alias ins='sudo apt install -y'
# 3. Show my public IP (Check VPN status)
alias myip='curl ifconfig.me'
# 4. Clear screen easily
alias c='clear'
# 5. List files like a pro (Hidden files + Sizes)
alias ll='ls -lah'
myip likhein, aur
dekhein jaadu!Pro Tip: 'autoremove' kyun zaroori hai?
Upar alias mein humne autoremove use kiya. Jab aap koi tool install karte hain, to uske sath kuch
supporting files (dependencies) bhi aati hain. Jab aap tool delete karte hain, to ye supporting files padi reh
jati hain aur junk ban jati hain.
apt autoremove system ka kachra saaf karta hai aur disk space bachata hai.
Part 8: The Language of Hackers (Linux Terminal 101)
Movies mein aapne hackers ko tezi se keyboard par type karte dekha hoga, bina mouse ko chhue. Wo show-off nahi
hai, wo necessity hai.
Graphical User Interface (GUI) slow hota hai. Terminal (CLI) light ki speed se kaam karta hai.
Aaj hum Linux File System ke labyrinth (bhul-bhulaiya) mein chalna seekhenge. Agar aap files
dhoond nahi sakte, to aap unhe hack bhi nahi kar sakte.
1. The Linux File System (Windows se alag kaise hai?)
Windows mein aap C:\ drive, D:\ drive dekhte hain. Linux mein koi "Drives" nahi hoti.
Linux ek Ulta Ped (Inverted Tree) hai. Sab kuch ek hi jad (root) se shuru hota hai jise hum
/ (Forward Slash) kehte hain.
Must Know Directories (Folders)
- / (Root): Ye shuruwat hai. System ka sabse main darwaza.
- /home/kali: Ye aapka ghar hai. Aapki downloads, documents yahi milengi. (Windows ke "My Documents" jaisa).
- /bin: Yahan saare tools (commands) rehte hain. Jaise
ls,cp,cat. - /etc: System ki settings/configuration files yahan hoti hain (Registry jaisa).
- /tmp: Temporary files. Restart hone par ye khali ho jata hai.
2. Navigation (GPS Commands)
Terminal mein aap andhe (blind) hote hain. Aapko commands use karke dekhna padta hai ki aap kahan hain aur aas-paas kya hai.
/home/kali (Matlab hum abhi apne ghar mein hain).. se shuru hoti hai (jaise .bashrc), wo hidden hoti hai.
/home/kali le aayegi.3. Creation & Destruction (God Powers)
Ab hum seekhenge files banana aur delete karna. Hacking mein hume aksar scripts banani padti hain aur logs delete karne padte hain.
The Golden Rule: Tab Completion
Beginners poora naam type karte hain: cd Do... Dow... Down... Downloads.
Hacker ban na hai to TAB Key dabana seekho.
Sirf cd Do likho aur TAB daba do. Linux apne aap spelling complete kar dega.
Agar wo complete nahi kar raha, iska matlab aapne spelling galat likhi hai ya wahan wo file exist nahi karti.
Part 9: The Hacker's Arsenal (Essential Linux Commands)
Linux mein hazaaron commands hain. Kya aapko sab yaad karni hain? Bilkul nahi.
Ek pro hacker sirf wo commands yaad rakhta hai jo roz kaam aati hain. Baaki ke liye hum "Manual" use karte hain.
Is part ko humne 4 categories mein divide kiya hai: Permissions, Network, File Searching, aur System
Control. Ye wo tools hain jo aap roz use karenge.
1. The Gatekeeper (Permissions & Ownership)
Hacking mein sabse common error hota hai: Permission Denied.
Linux security bahut strict hai. Har file ke paas 3 rights hote hain:
Read (r), Write (w), Execute (x).
The Magic Numbers (chmod)
Computers permission ko numbers mein samajhte hain:
- 4 = Read (Padhna)
- 2 = Write (Likhna/Edit karna)
- 1 = Execute (Run karna)
Example: 7 (4+2+1) ka matlab hai Full Permission.
2. The Network Eyes (Reconnaissance)
Bina Network commands ke hacker waisa hi hai jaise bina aankhon ke sniper.
3. The Search Light (Grep & Pipes)
Ye Linux ka sabse powerful feature hai.
Pipe ( | ) ek command ke output ko doosri command ka input bana deta hai.
Grep us output mein se specific cheez dhoondta hai.
4. System Control (Task Manager)
Windows mein jab PC hang hota hai to aap Ctrl+Alt+Del dabate hain. Linux mein hum process ko Kill karte hain.
Cheat Code: Manual Pages
Agar aap kisi command ka use bhool jao, to Google karne ki zaroorat nahi hai.
Bas man (Manual) command use karo.
Try: man ls ya ls --help
Ye aapko us tool ki poori janam-kundali de dega.
💀 The Gatekeeper Exam (Part 1 to Part 9)
Ab tak aapne Kali Linux install kiya, file system samjha, aur terminal ke basic weapons chalana seekha.
Aage badhne se pehle, ye check karna zaroori hai ki aapka foundation strong hai ya nahi. Agar aap yahan fail
huye, to aage ki hacking techniques aapke sar ke upar se jayengi.
Rule: Bina upar scroll kiye answer dene ki koshish karein.
Phase 1: Architecture & Setup
Q1: Hacking start karne se pehle VirtualBox mein "Snapshot" lena kyun zaroori hai?
Q2: Kali Linux install karte waqt "Partitioning" ka kya matlab hai?
Phase 2: Terminal Survival
Q3: Agar aapko terminal mein "Hidden Files" (jo . se shuru hoti hain) dekhni hain, to kaunsi command use karenge?
Q4: Aap 'Downloads' folder mein hain. Wapas 'Home' directory mein jaane ka sabse fast shortcut kya hai?
Q5: `sudo apt update` command actually kya karti hai?
Phase 3: God Mode & Errors
Q6: Aapne ek Python script download ki lekin wo run nahi ho rahi aur "Permission Denied" bol rahi hai. Solution kya hai?
Q7: Terminal mein `|` (Pipe) symbol ka kya kaam hai? (e.g., `cat file.txt | grep "pass"`)
Q8: Ek tool hang ho gaya hai aur band nahi ho raha. Use zabardasti (Force Kill) band karne ke liye kaunsa flag use hoga?
📊 Result Analysis
0-3 Correct: 👶 Script Kiddie. Aapne dhyan se nahi padha. Part 7 aur 8
dobara padhein.
4-6 Correct: 👨💻 Linux User. Basic clear hai, lekin Permissions aur Piping
mein practice chahiye.
7-8 Correct: 🕵️ Elite Hacker in Making. Aapka base solid hai. Aap
Part 10 (Anonymity) ke liye taiyar hain.